Application Tutorial:
a Restaurant app
Part III
- Introduction
- Extensions and GUI annotations
- State machines
- Advanced references
- More advanced references
- The End
Introduction
Extensions and GUI annotations
In the topic ‘Derivations: conditional expressions’ we’ve calculated the number Total as part of the stategroup Discount applicable. In our app it is therefore shown inside a box along Discount period and Discount. Both visually and model-wise it’s more appropriate to show and calculate Total outside of Discount applicable. Let’s adjust the model accordingly. The last part for the Orders collection should look like this:
'Orders': collection ['Order'] {
	...

	'Discount applicable': stategroup (
		'Yes' {
			'Discount period': text -> ^ ^ .'Management' .'Discount periods'[]
			'Discount': number 'eurocent' = switch ^ .'Subtotal' compare ( >'Discount period' .'Minimal spendings' ) (
				| < => 0
				| >= => product (
					from 'percent' >'Discount period' .'Percentage' as 'fraction',
					^ .'Subtotal'
				)
			)
		}
		'No' { }
	)

	'Total': number 'eurocent' = switch .'Discount applicable' (
		|'Yes' as $'discount' => sum ( $'discount' ^ .'Subtotal' , - $'discount' .'Discount' )
		|'No' => .'Subtotal'
	)

	'VAT': number 'eurocent' = product (
		from 'percent' ^ .'Management' .'VAT percentage' as 'fraction' ,
		.'Total'
	)
}
Instead of VAT using a state switch now Total switches on the state of Discount applicable.
Working towards the processes of order preparation and service let’s take this opportunity to also add the stategroups Line status and Order status within the collections Order lines and Orders respectively. The top part of collection Orders now is this:
'Orders': collection ['Order'] {
	'Order': text
	'Order type': stategroup (
		'Takeaway' { }
		'In-house' {
			'Table': text -> ^ ^ .'Tables'[] -< 'Orders'
		}
	)
	'Order lines': collection ['Order line'] {
		'Order line': text
		'Item': text -> ^ ^ .'Menu'[]
		'Amount': number 'units'
		'Line total': number 'eurocent' = product (
			.'Amount' as 'units',
			>'Item'.'Selling price'
		)
		'Line status': stategroup (
			'On hold' { }
			'Placed' { }
			'Service' { }
			'Served' { }
		)
	}
	'Order status': stategroup (
		'Open' { }
		'Closed' { }
	)
	'Subtotal': number 'eurocent' = sum .'Order lines'* .'Line total'
	...
}
Customers sometimes change their mind while ordering, so we don’t want to place evey order line immediately, but place all lines once everybody is happy. To support this process we’ve added Line status. It has these states:
- state
On holdfor when an order line is inserted but the customer might change their mind - state
Placedfor an order line that is ‘approved’ and ready to be prepared - state
Servicefor when the order line is prepared and can be served to the customer - state
Servedfor an order line that is served to the customer
Order status has states Open after placing the first order, and Closed after payment of the bill. This brings us to the next adjustment: the command Place new order. We need to add the states corresponding to these stategroups when placing an new order:
'Place new order': command {
	...
} => update .'Orders' = create (
	'Order' = @ .'Provide an order number'
	'Order type' = switch @ .'Where is the meal consumed?' (
		|'Outside of restaurant' => create 'Takeaway' ( )
		|'At the restaurant' as $ => create 'In-house' (
			'Table' = $ .'Where is the customer seated?'
		)
	)
	'Order lines' = walk @ .'Order lines' as $ (
		create (
			'Order line' = $ .'Provide an order line number'
			'Item' = $ .'Item to be consumed'
			'Amount' = $ .'Amount of this item'
			'Line status' = create 'Placed' ( )
		)
	)
	'Order status' = create 'Open' ( )
	'Discount applicable' = switch @ .'Apply discount?' (
		|'Yes' as $ => create 'Yes' (
			'Discount period' = $ .'Discount period'
		)
		|'No' => create 'No' ( )
	)
)
No new parameters need to be added to the command, but we have to create the states Placed and Open when executing this command. Both are not determined by input from the user (therefore not depending on a parameter), as the purpose of the command implies these states and can be statically determined.
Let’s take a look at our app:
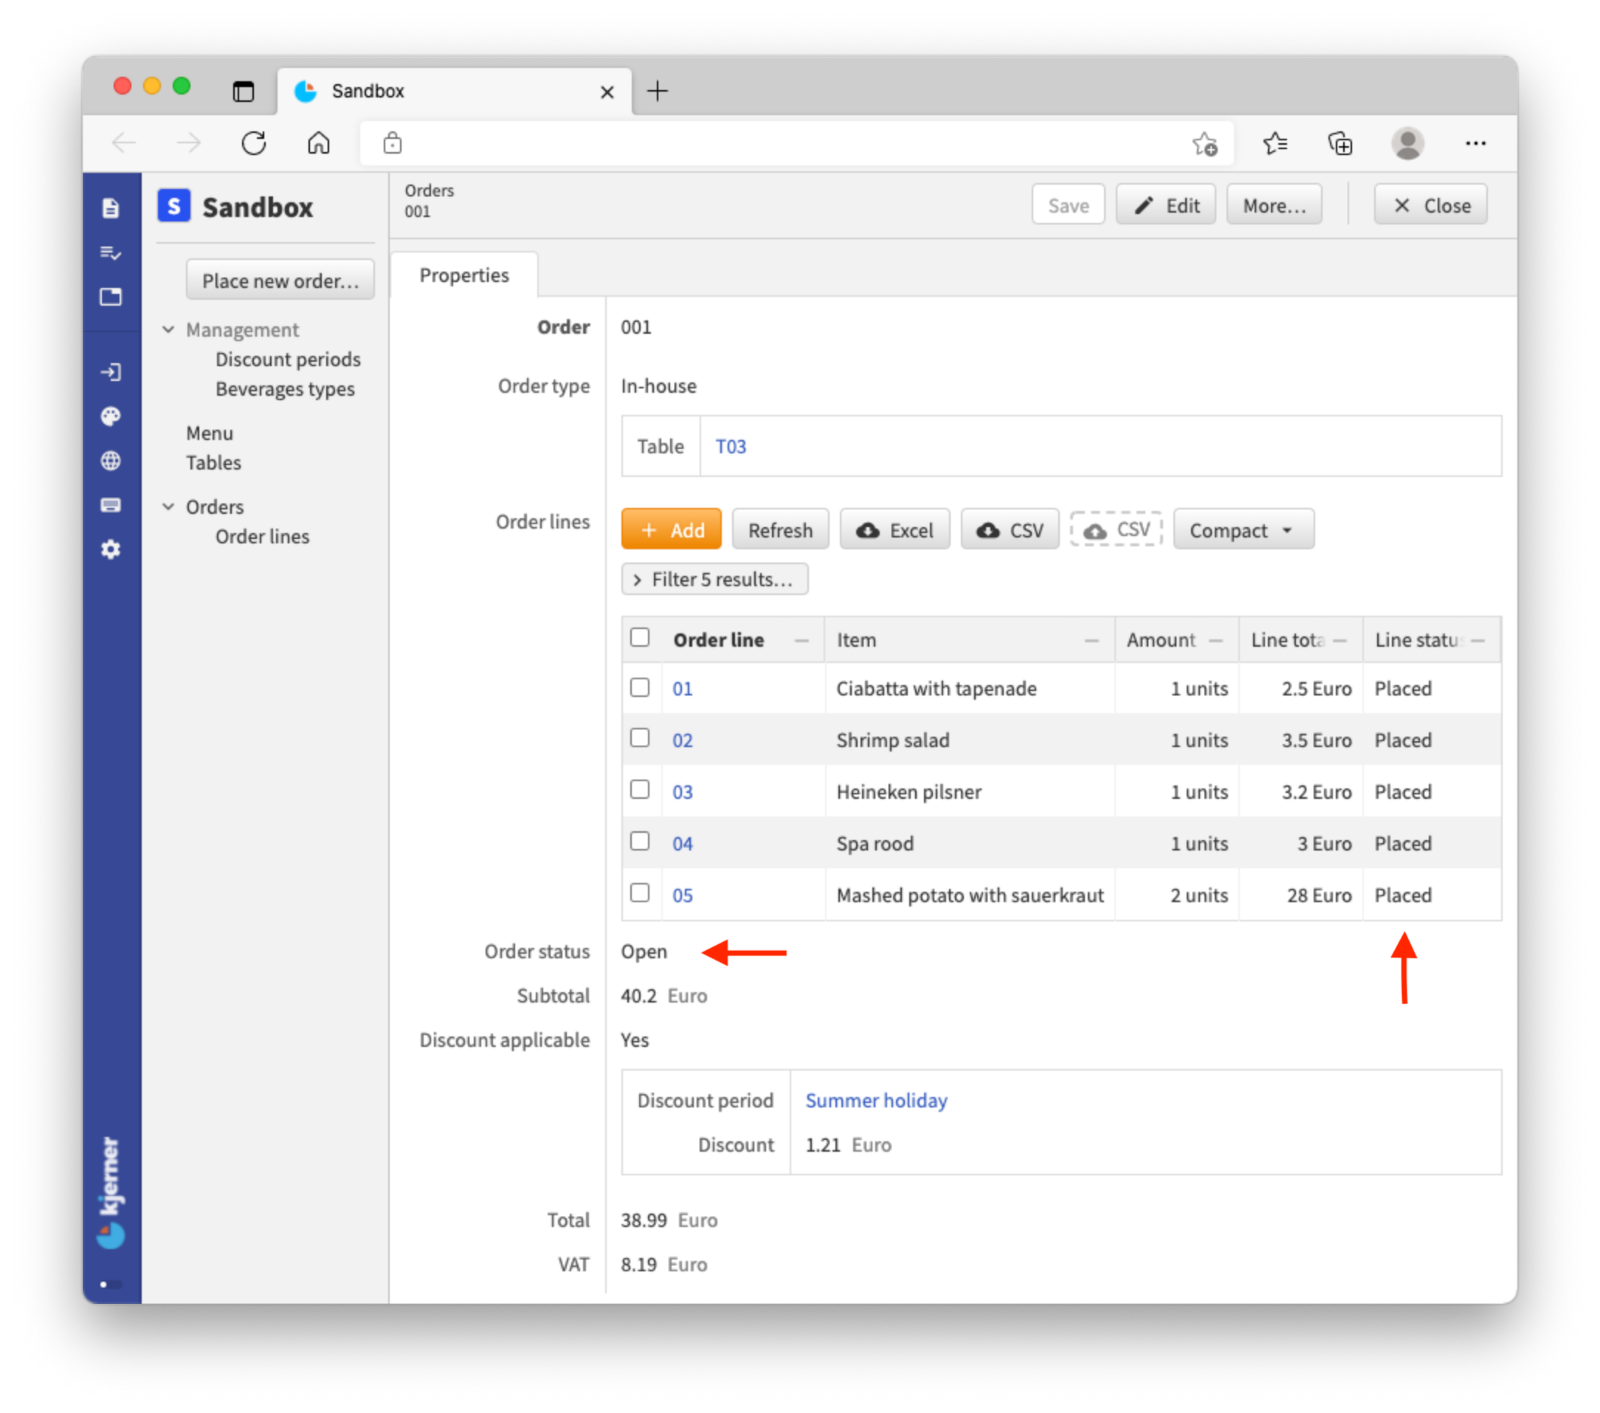
Also add @default: auto-increment this to the existing lines within collection Orders and Order lines repectively:
'Order': text @default: auto-increment

'Order line': text @default: auto-increment
This is called a GUI annotation and makes sure that when you add an order or order line it automatically creates a followup number for those keys. GUI annotations always have the symbol @ as prefix. GUI annotations need a seperate topic to be described in full, so we won’t elaborate on this right now. This just makes it easier to add orders and order lines for now.
Finally, let’s create a group Service and add Menu, Orders and Place new order in it, to further streamline the model.
As you might have noticed it is easy to make adjustments to your model: Moving a block of code, adding a derivation or property, changing the layout and applying a GUI annotation. Finetuning your model is quite easy without losing the integrity of your data.
<tutorial folder:
./_docs/tutorials/restaurant1/step_07/>
State machines
In the previous topic we’ve added Line status but the different states do not have any effect yet. The order line status needs to change according to the process in our restaurant. In short the process looks like this: Service goes to a table, customers order their drinks and/or dishes and might change their minds, orders are placed to be prepared and finally, the orders are delivered to the table.
So, we want to change the state without accidentilly skip a state. Let’s implement this:
'Line status': stategroup (
	'On hold' {
		'Ready for preparation': command { } => update ^ .'Line status' = create 'Placed' ( )
	}
	'Placed' {
		'Ready for service': command { } => update ^ .'Line status' = create 'Service' ( )
	}
	'Service' {
		'Served': command { } => update ^ .'Line status' = create 'Served' ( )
	}
	'Served' { }
)
Each state got a command that can change the current state to the next one. Notice that these commands do not have a command definition, only a command implementation, because all we need here is a button.
Build the model and view it in your browser by going to ‘Orders’ and selecting order 001 (or input an order first):
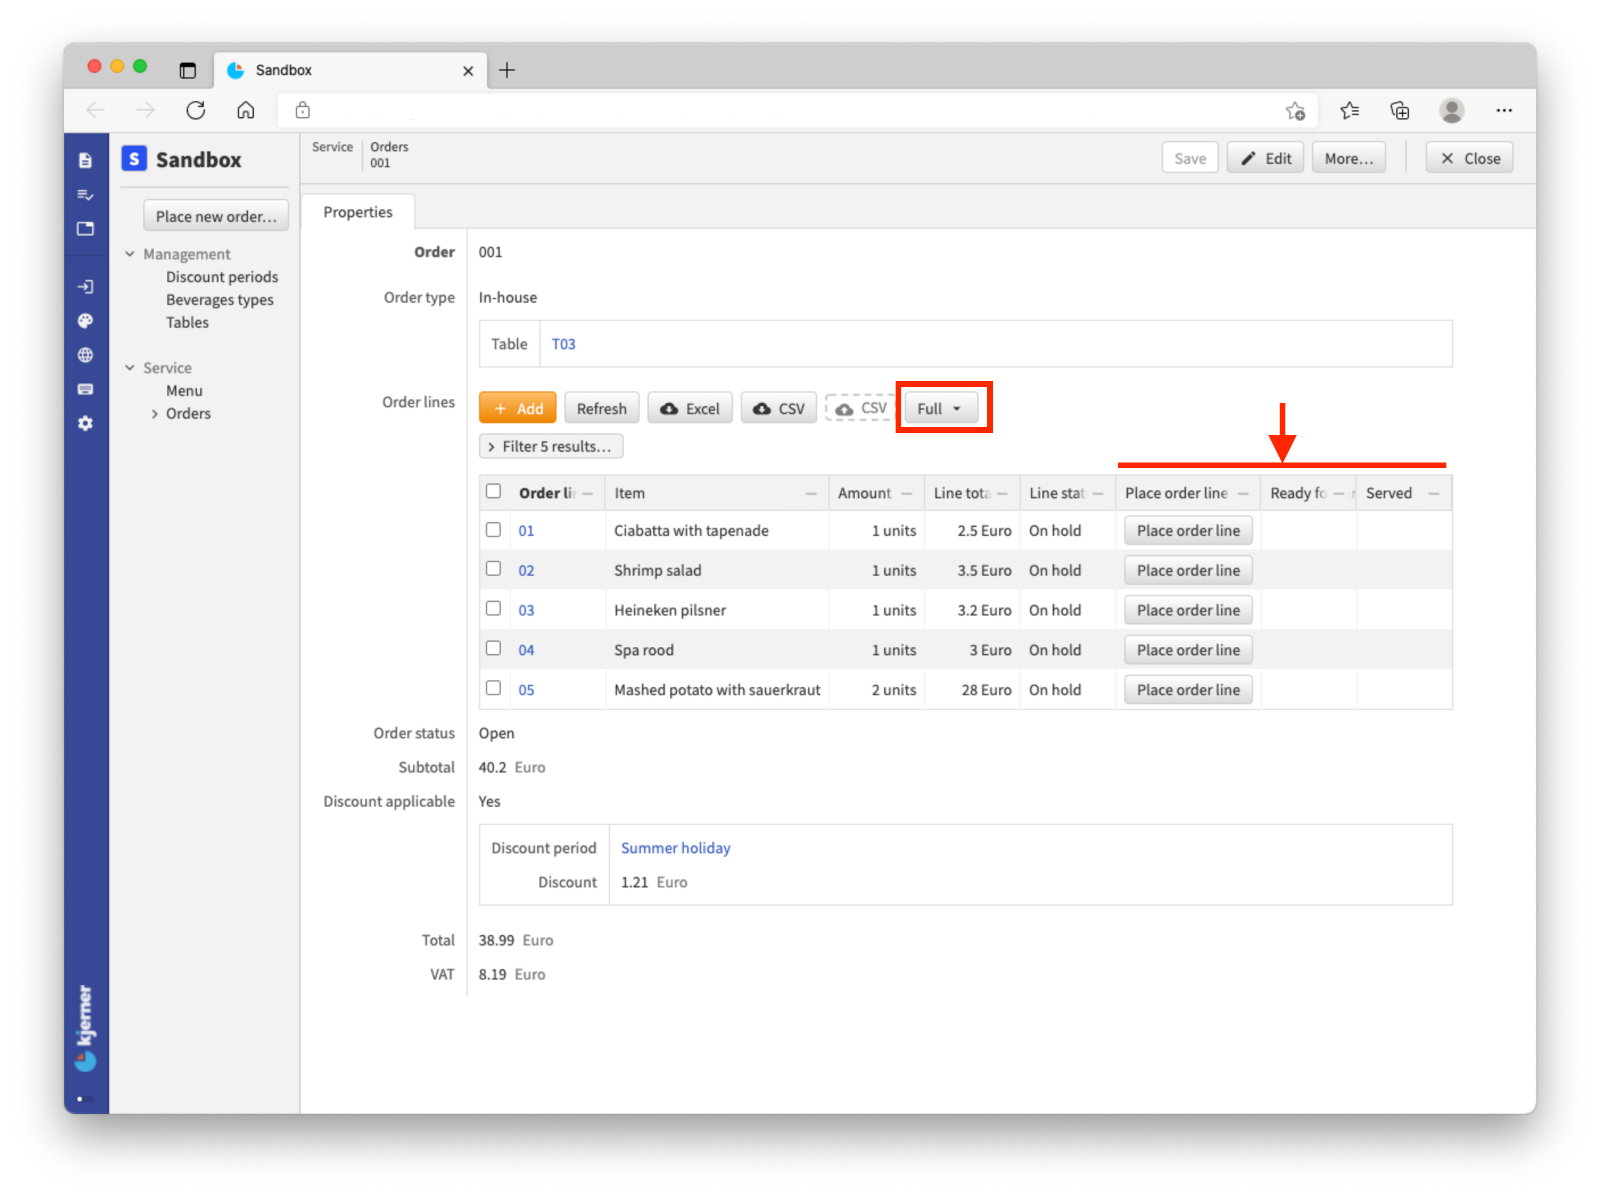 Set the view to
 Full. This will reveil some extra columns with in the first column a button Place order line (if you inserted an order yourself you must have selected On hold as line state).
Click the button of an order line to place it and refresh the table Order lines. As you can see the button disappears from the column Place order line and a new one appears in the column Ready for service. Repeat for this button and see what happens.
If you can imagine that different people with different roles within the restaurant have access to specific parts of the model, you could organise who gets to push which button. This is possible by implementing users and their access rights, which will be discussed in another topic.
Now clicking each line individually can become a hassle, so let’s create a command that can set all lines with state On hold within one order to Placed:
'Place order lines': command { } => walk .'Order lines' as $'line' (
	switch $'line' .'Line status' (
		|'On hold' => update $'line' (
			'Line status' = create 'Placed' ( )
		)
		|'Placed' => ignore
		|'Service' => ignore
		|'Served' => ignore
	)
)
This command (again only a command implementation) is placed below Order lines within Orders. We see familiar and new words.
The command implementation shows a ‘do this’ (=>), followed this time by walk and a node type path to the collection Order lines, which means ‘walk’ along all the nodes of this collection. Each node in the collection is temporarily stored as $'line'. We want the app to check for each of these nodes the property Line status and perform a ‘do this’ depending on the state. If the state is On hold then we want to update that node by creating the state Placed for its property Line status. In any other case we want to ignore it and do nothing.
In short: Walk along all the nodes of collection Order lines and if the property Line status of a particular node is set to On hold update the node by changing the Line status to state Placed.
Build the model and view the result, again in Orders and selecting 001:
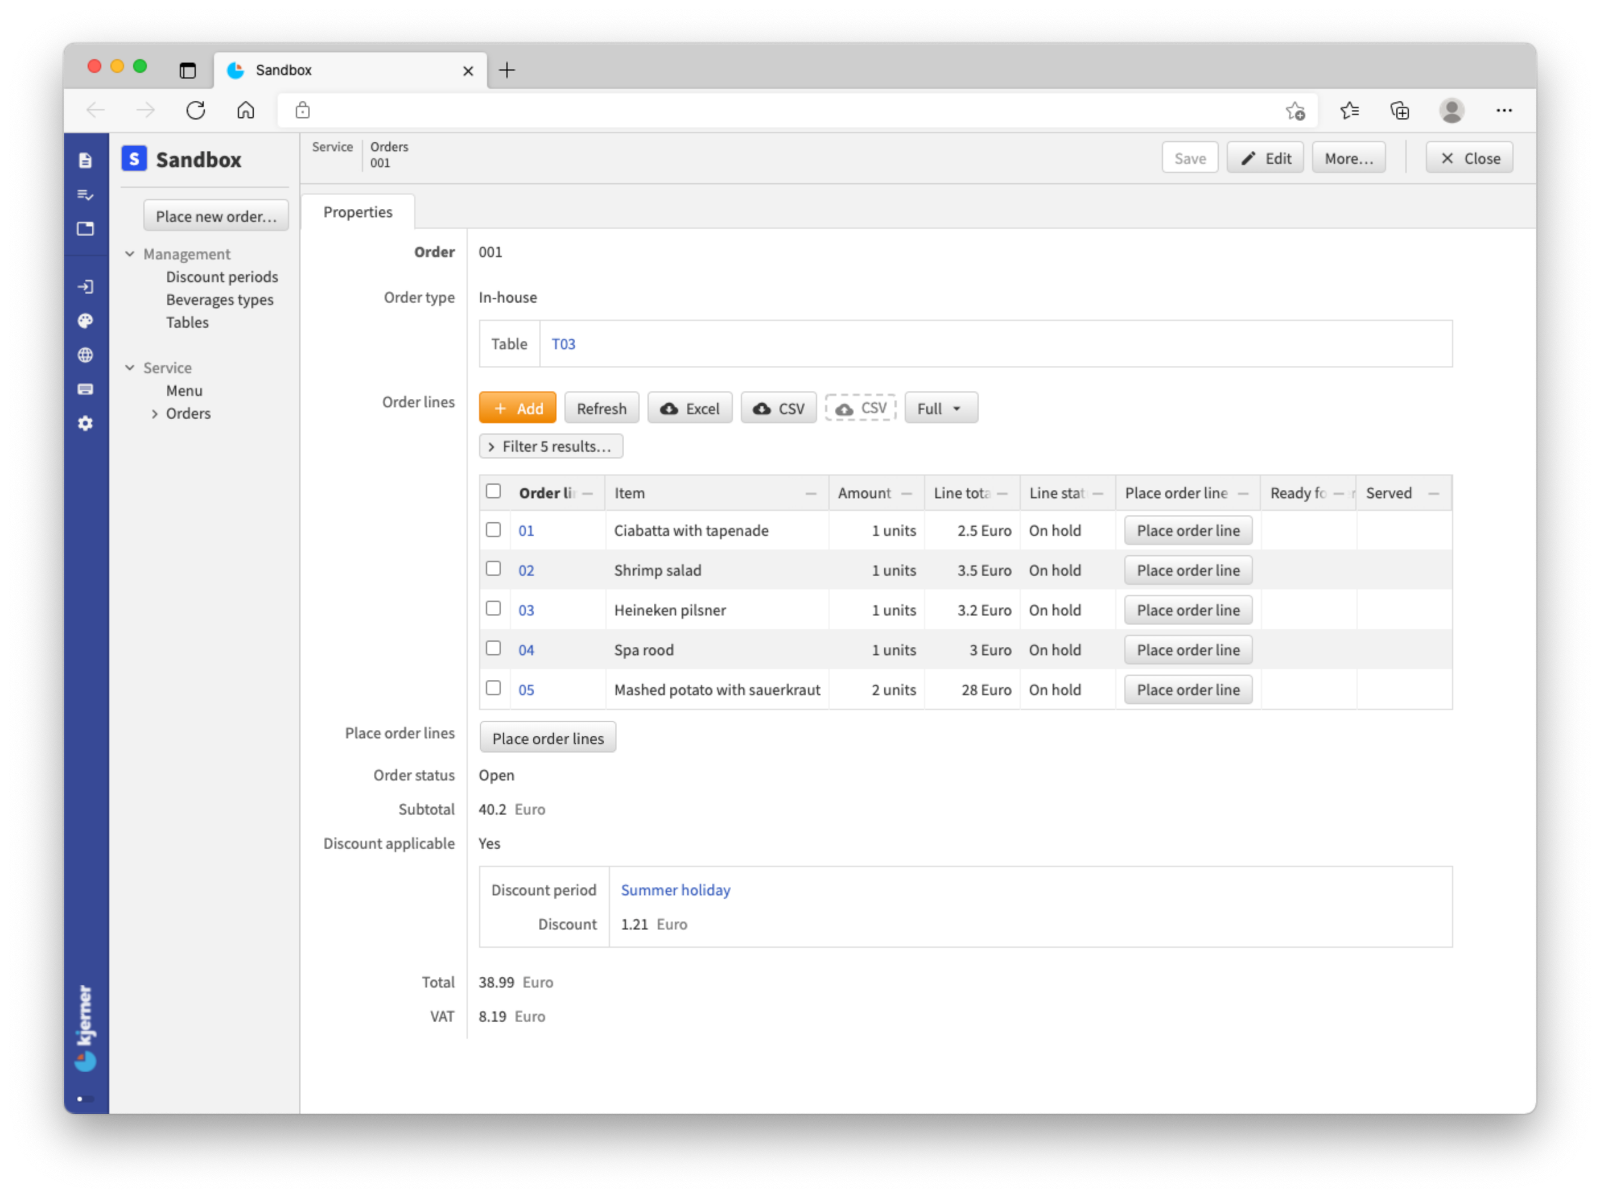 Click the button and refresh
 Order lines. This command only affects lines with state On hold.
Then there is another process we want to support: When the customer leaves we want to make sure all order lines are served and the bill is paid, so we can close the order.
Add these new lines in the state Open of stategroup Order status and take a look at it:
'Order status': stategroup (
	'Open' {
		'All served': stategroup = switch ^ .'Order lines'* .'Line status'?'On hold' (
			| nodes => 'No' ( )
			| none => switch ^ .'Order lines'* .'Line status'?'Placed' (
				| nodes => 'No' ( )
				| none => switch ^ .'Order lines'* .'Line status'?'Service' (
					| nodes => 'No' ( )
					| none => 'Yes' ( )
				)
			)
		) (
			'No' { }
			'Yes' {
				'Paid': command { } => update ^ ^ .'Order status' = create 'Closed' ( )
			}
		)
	}
	'Closed' { }
)
When the Order status is Open we want to check if all order lines are Served but we don’t know how many order lines an order contains. By checking if any nodes within Line status exist with the states On hold, Placed or Service we can either confirm or deny that all order lines are served.
Important to notice that this line would switch on the state of Line status:
switch .'Line status' ( ... )
While this line switches on whether nodes with status On hold exist or not:
switch .'Order lines'* .'Line status'?'On hold' ( ... )
(For the purpose of comparison ^ is left out in this line)
This line says: Check all nodes (*) of Order lines for the state On hold of stategroup Line status. The result is either there are nodes with this state (nodes) or there are no nodes with this state (none). If the result is none we still want to check for the other states in the same way. Only if there are no nodes with the last state we can be sure all nodes are Served, because order lines can only have and must have at least one of these four states.
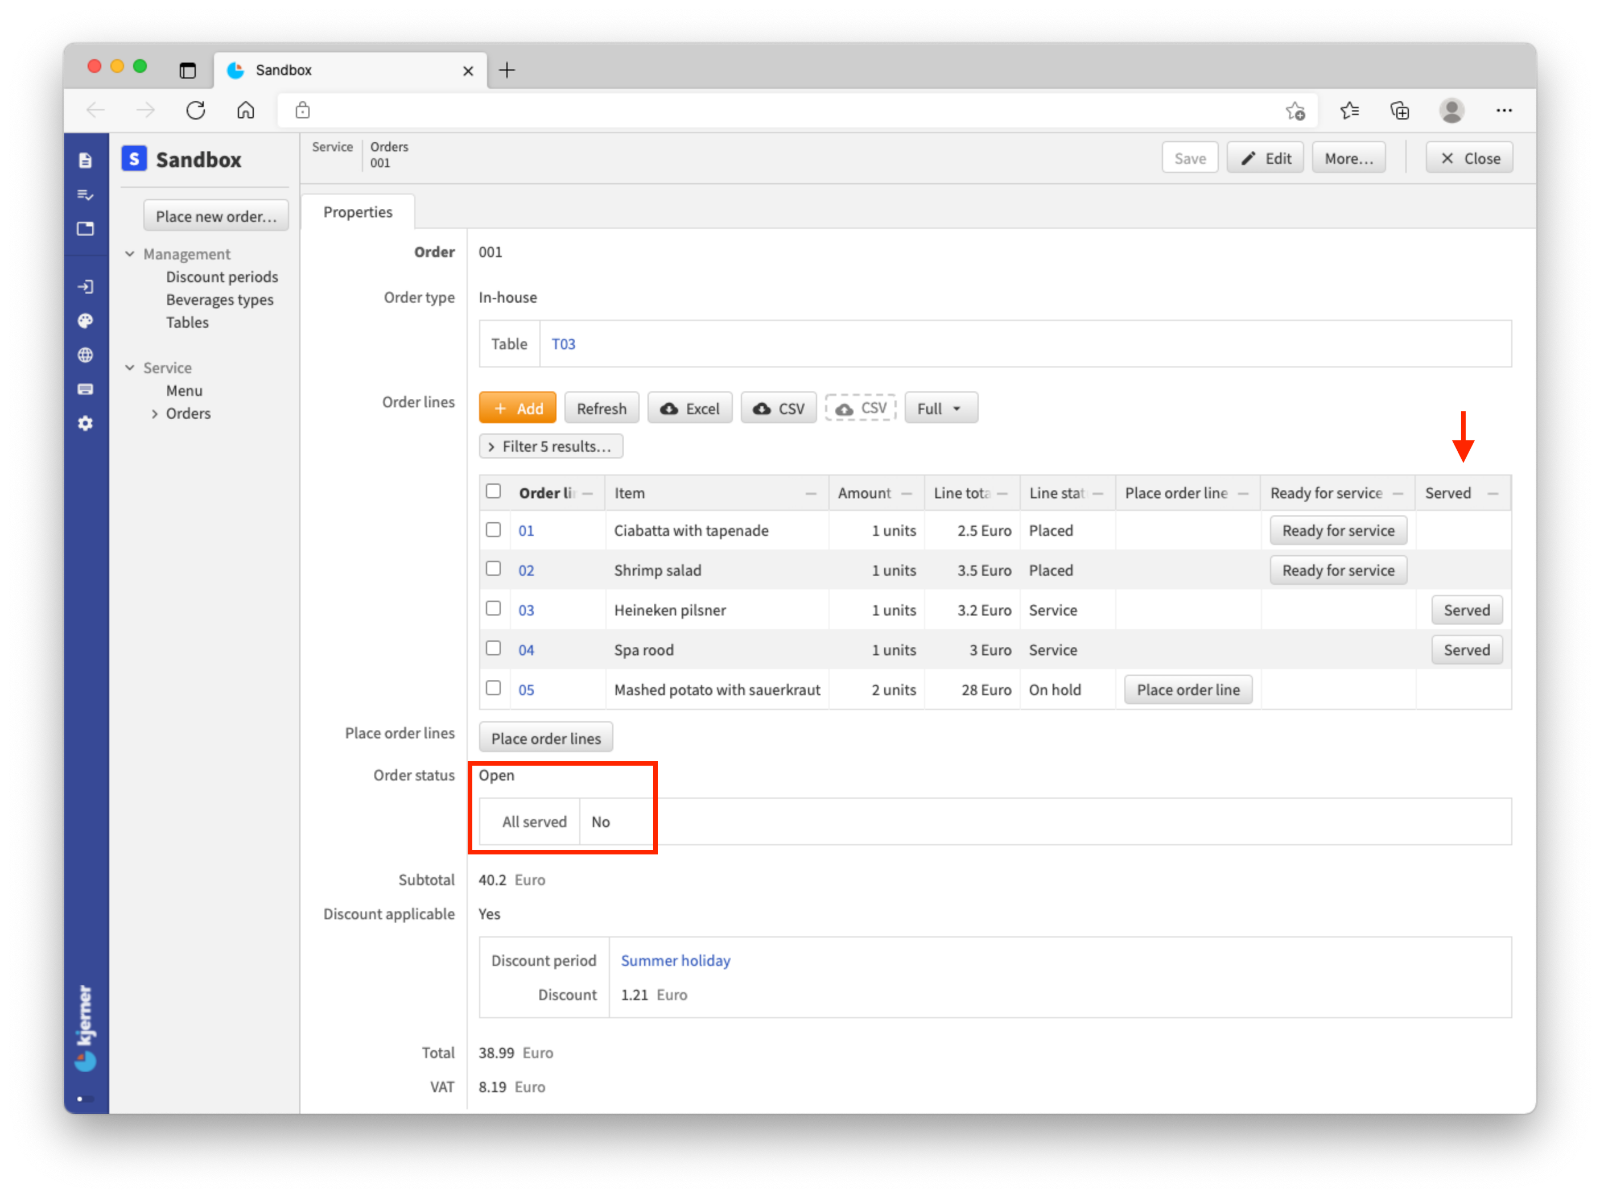
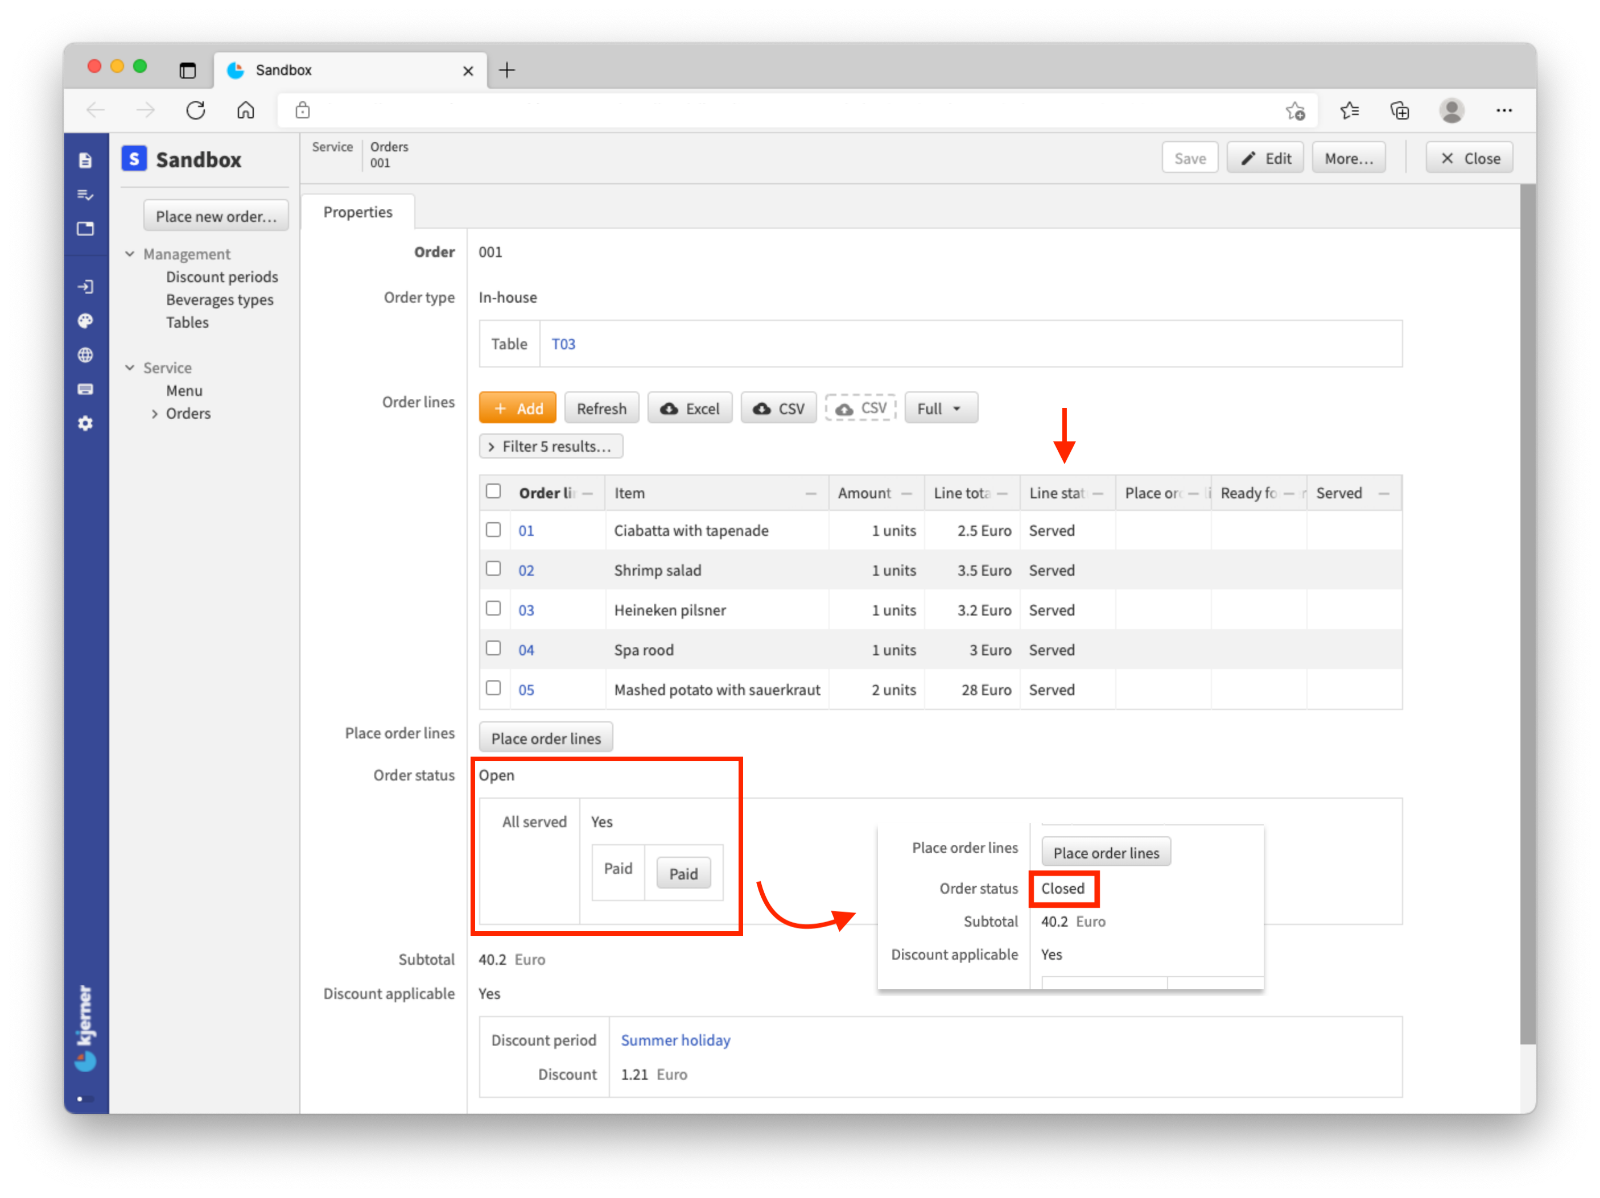
Once it is confirmed that all order lines are served (state Yes) we provide a button that can be clicked when the customer has paid the bill. This will change the state of Order status to Closed.
Check out the app:
<tutorial folder:
./_docs/tutorials/restaurant1/step_08/>
Advanced references
Before we get to the advanced part we add some more common lines to the model.
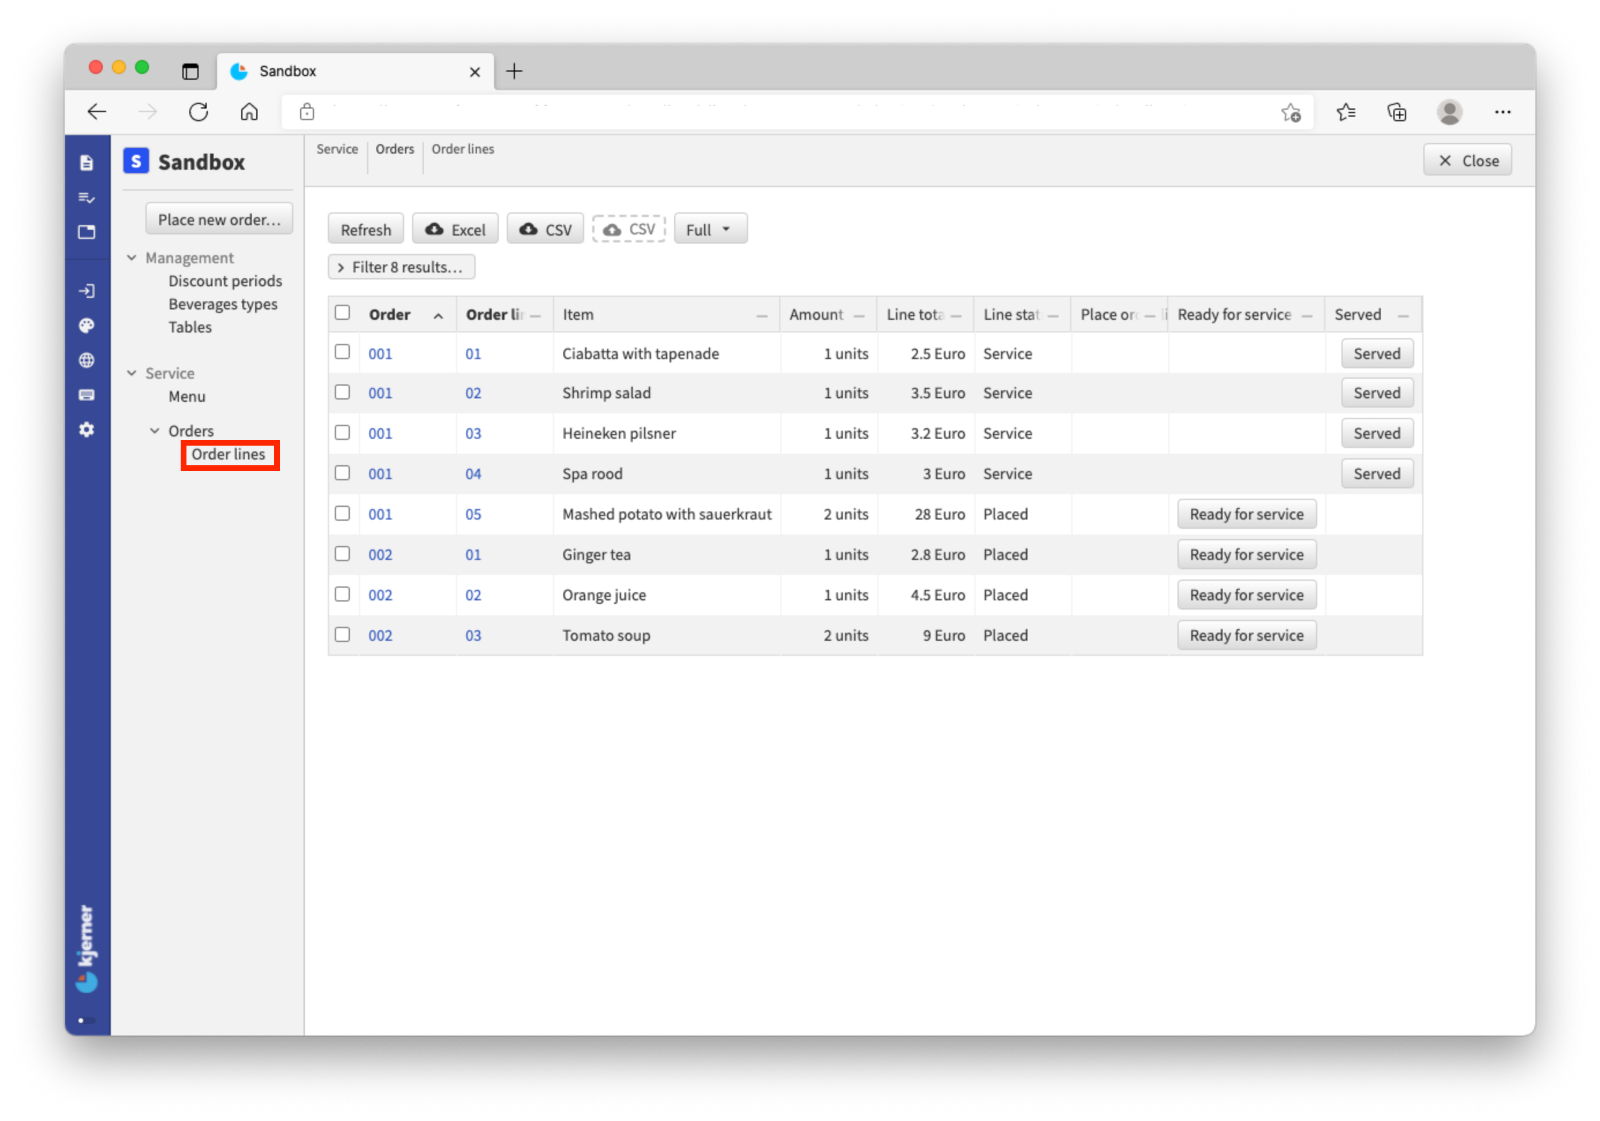
When food and drinks are prepared and ready for service, we would like to provide service with additional information, for example the priority of service (when food is hot it needs to be served asap) and the table to serve to. We will add this information in steps. Take a look at the overview Order lines, with the view set to Full:
 Add
Add Priority to the state Service of stategroup Line status:
'Service' {
	'Priority': stategroup = switch ^ >'Item' .'Item type' (
		|'Beverage' => 'Low' ( )
		|'Dish' as $'dish' => switch $'dish' .'Dish type' (
			|'Appetizer' => 'Medium' ( )
			|'Main course' => 'High' ( )
			|'Dessert' => 'Low' ( )
		)
	) (
		'Low' { }
		'Medium' { }
		'High' { }
	)
	'Served': command { } => update ^ .'Line status' = create 'Served' ( )
}
This looks similar to the previously defined state derivation of stategroup All served (within state Open of stategroup Order status), exept here we switch on the state of the stategroup, not whether a collection has nodes or not.
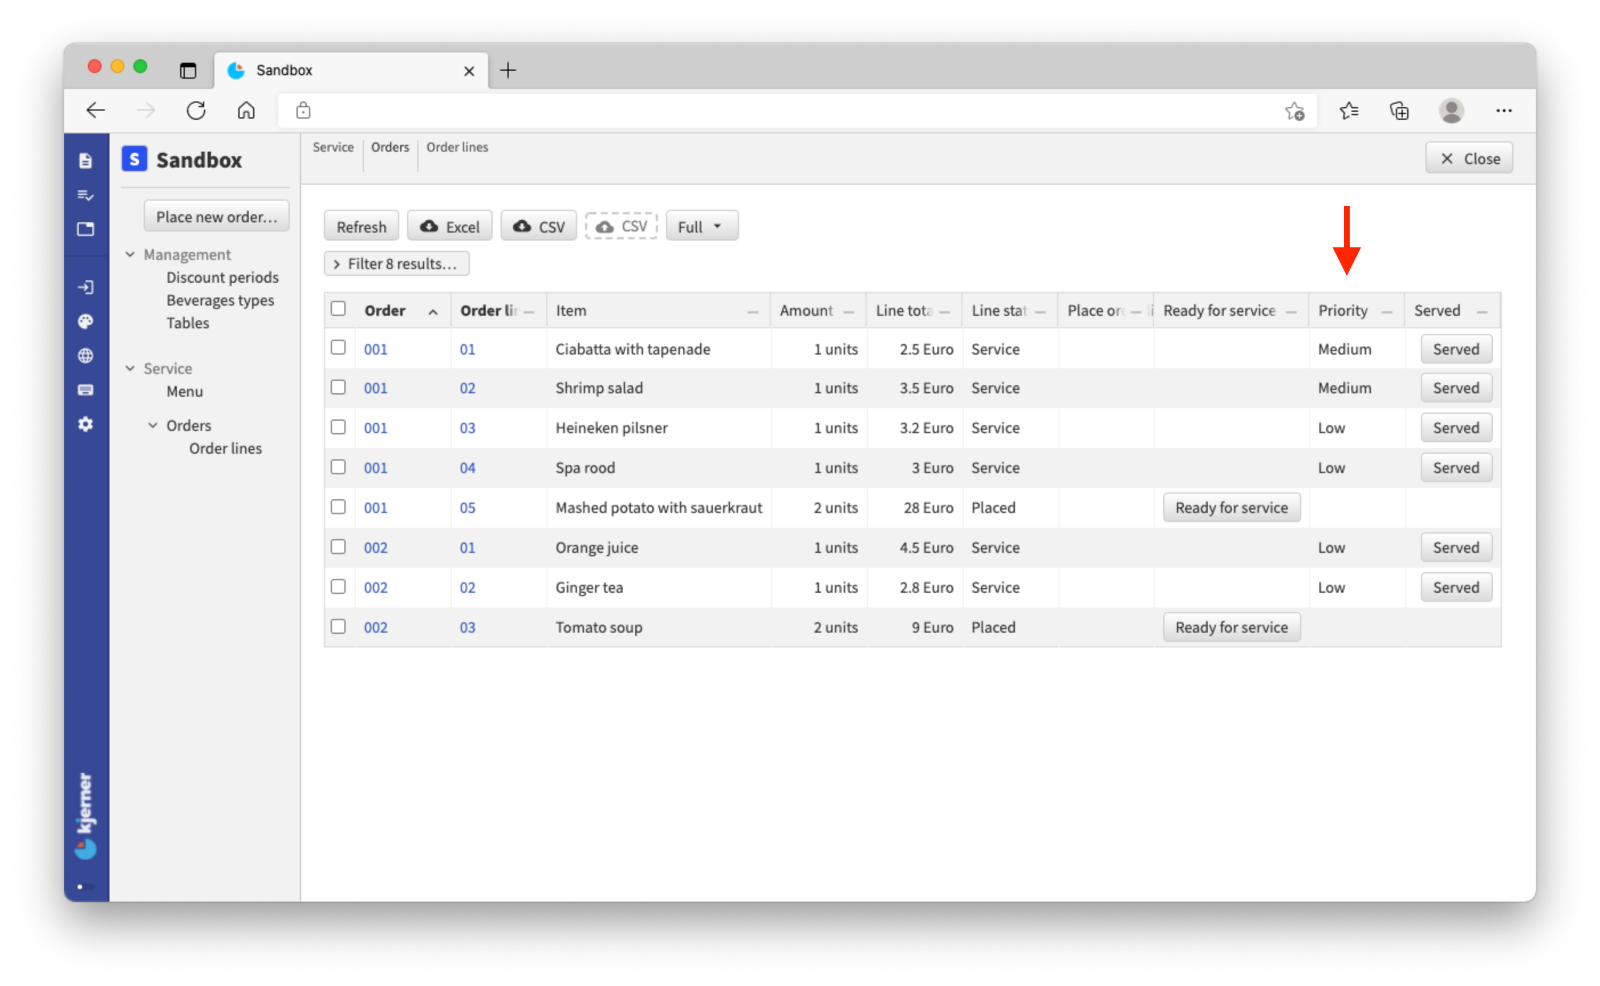
To not make the model too complicated at this point we simply say that desserts have a low priority (mainly cold food), appetizers a medium priority (could be warm food) and main courses a high priority (mainly warm food). Check out the extra column:
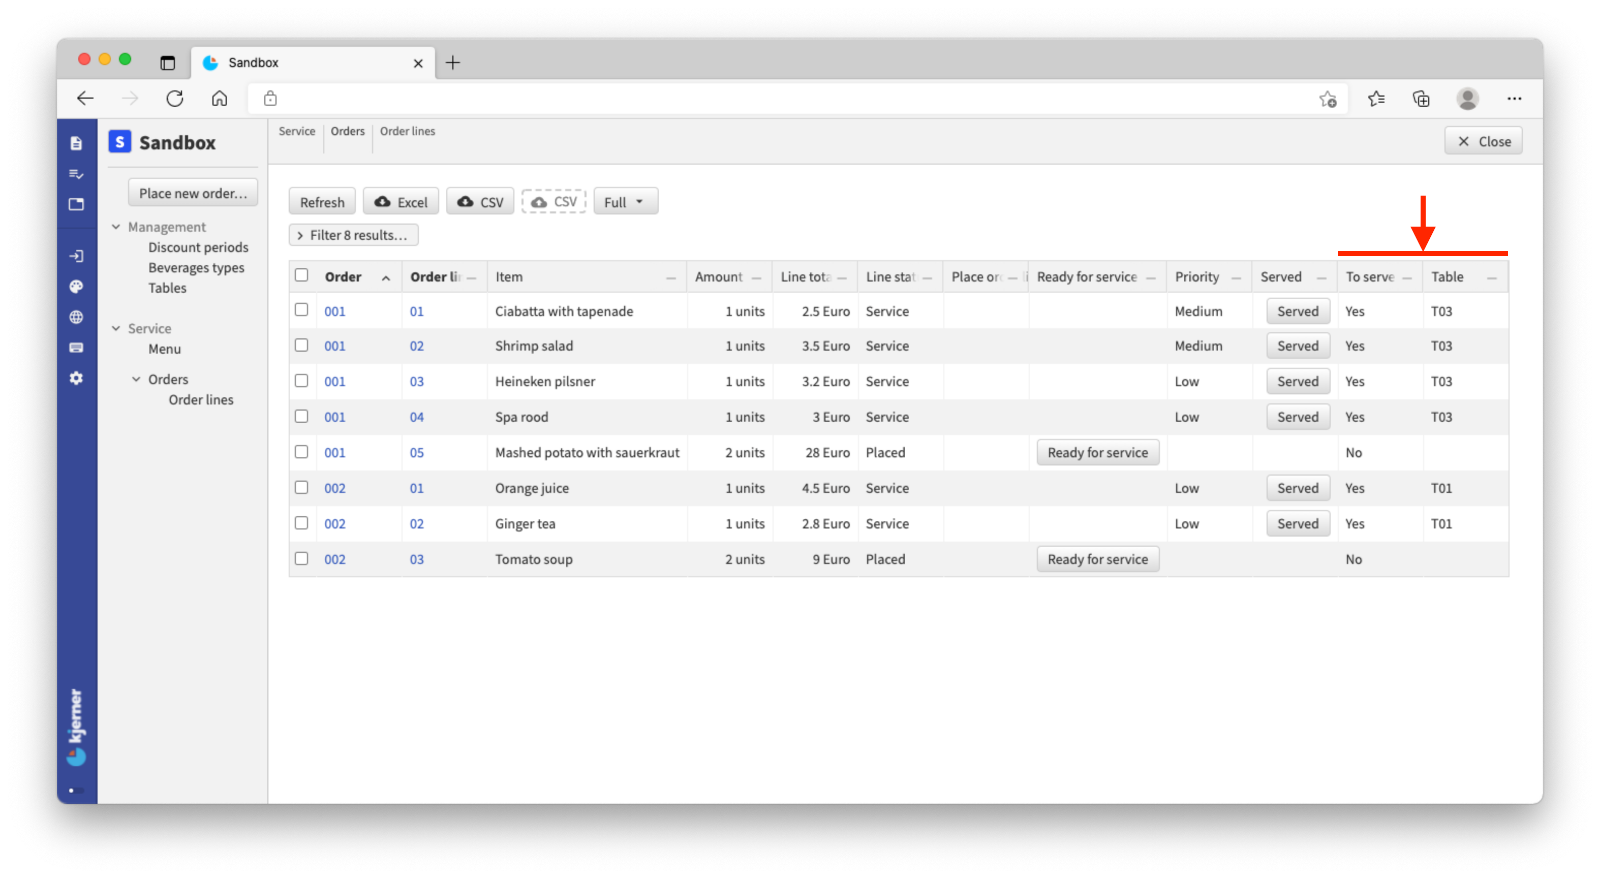
Only if an order is of order type In-house we would like to show the table to serve to when it’s ready to be served. To achieve this we have to look at the states of both stategroups Order type and Line status:
'To serve': stategroup = switch ^ . 'Order type' (
	| 'Takeaway' => 'No' ( )
	| 'In-house' as $'in-house' => switch . 'Line status' (
		|'On hold' => 'No' ( )
		|'Placed' => 'No' ( )
		|'Service' => 'Yes' ( 'Table' = $'in-house' >'Table' )
		|'Served' => 'No' ( )
	)
) (
		'No' { }
		'Yes' {
			'Table': text -> ^ ^ ^ ^ .'Management' .'Tables'[] = parameter
		}
	)
This shows the table if To serve is Yes:
 The main part again looks like structures we’ve seen before: The code has a state switches that switch on stategroups. The addition is between parenthesis. This is also known as a state parameter (similar to the command parameter) and with it we can supply a state with an additional piece of information from a node, in this case
 Table.
We temporarily stored the node of state In-house as $'in-house' and a few lines down in the model we want to follow the reference of Table within that node to appoint it to the state parameter Table. Then when we get to the state Yes we can derive the value of text property Table from the parameter, but first have to tell that this property is related to the collection Tables in group Management by providing a reference to it.
By providing this reference, as part of the definition of Table, we ‘close the loop’ and make sure that the value of the derivation can only be of the same collection Tables as the text property Table. The compiler will check this ‘reference loop’ during compilation and if we by accident referenced for example another collection Tables it will throw an error.
Let’s say we would also like to show the priority when stategroup To serve has state Yes. We do this for explanatory purposes, because the model it creates is not clean and it will show the priority in the table twice, but the structure it will show is interesting and important.
To achieve this it is required to have access to the node of state Service of stategroup Line status. Therfore add $'service' to the state Service in the state switch of stategroup To serve:
'To serve': stategroup = switch ^ . 'Order type' (
	| 'Takeaway' => 'No' ( )
	| 'In-house' as $'in-house' => switch . 'Line status' (
		|'On hold' => 'No' ( )
		|'Placed' => 'No' ( )
		|'Service' as $'service' => 'Yes' ( 'Table' = $'in-house' >'Table' )
		|'Served' => 'No' ( )
	)
) ( ... )
If we build the model like this the compiler will throw an error saying it can’t find the named object in-house. We created another ‘sticky note’ $'service' on a lower level than the previous ‘sticky note’ $'in-house'. On this lower level the only reachable ‘sticky note’ is $'service'. It’s like the ‘sticky notes’ are stacked and only the last one is visible. To get to a ‘sticky note’ defined on higher levels we need to jump up thos levels, but not like using the regular ^, but by using $^. The temporarily stored nodes create a hierachy in itself.
Another thing to notice is that the names we gave to these temporarily stored nodes are only for human readability and have no meaning to the compiler. We could just as easily have used only $.
Applying this new knowledge creates this:
'To serve': stategroup = switch ^ . 'Order type' (
	| 'Takeaway' => 'No' ( )
	| 'In-house' as $'in-house' => switch . 'Line status' (
		|'On hold' => 'No' ( )
		|'Placed' => 'No' ( )
		|'Service' as $'service' => 'Yes' ( 'Table' = $^ $'in-house' >'Table' ) // <--- !! $^
		|'Served' => 'No' ( )
	)
) ( ... )
Building the model now will show a problem, but it’s only a warning, saying we didn’t use service, so let’s use it:
'To serve': stategroup = switch ^ . 'Order type' (
	| 'Takeaway' => 'No' ( )
	| 'In-house' as $'in-house' => switch . 'Line status' (
		|'On hold' => 'No' ( )
		|'Placed' => 'No' ( )
		|'Service' as $'service' => 'Yes' where 'Service' = $'service' ( 'Table' = $^ $'in-house' >'Table' ) // <--- !! where ...
		|'Served' => 'No' ( )
	)
) (
		'No' { }
		'Yes' where 'Service' -> .'Line status'?'Service' {						// <--- !! where ...
			'Table': text -> ^ ^ ^ ^ .'Management' .'Tables'[] = parameter
		}
)
We’ve seen where being used before, but then applied to a text property and now applied to a state. It serves as a reference rule here as well and further defines the state Yes by adding the reference to a node of state Service.
If we ‘zoom out’ and look at the structure:
'To serve': stategroup = switch ... (
	| ...
	| ... => switch ... (
		| ...
		| ...
		|'Service' as $'service' => 'Yes' where 'Service' = $'service' ( ... )
		...
	)
) (
		...
		'Yes' where 'Service' -> .'Line status'?'Service' {
			...
		}
)
We see:
- a state derivation within a state derivation (two times
switch) - in case of state
Servicetemporarily store the node and ‘do this’: Initialize the stateYes - state
Yeswith where rule and reference (to ‘close the loop’) and a node type definition ({ … })
Now the node of state Service of stategroup Line status is available from within the state Yes of stategroup To serve. With a state switch we can determine the property Priority by deriving it from Priority within the node of this state Service:
'Yes' where 'Service' -> .'Line status'?'Service'
{
	'Table': text -> ^ ^ ^ ^ .'Management' .'Tables'[] = parameter
	'Priority': stategroup = switch .&'Service' .'Priority' (
		|'Low' => 'Low' ( )
		|'Medium' => 'Medium' ( )
		|'High' => 'High' ( )
	) (
		'Low' { }
		'Medium' { }
		'High' { }
	)
}
For referencing the reference rule (where) the &-symbol is used.
In our model we access the stategroup Priority of node Service by writing .&'Service' .'Priority'. The rest is a common state derivation.
By revisiting the Car example from the topic ‘References’, where we explained the where rule applied to a text property, we can show you why the notation .&'where' is used:
'Electric vehicles': collection ['Vehicle'] {
	'Vehicle': text
	'Color': text
	'Is': stategroup (
		'Fast' {
			'Top speed': number 'km/h'
		}
		'Slow' { }
	)
}

'Car': text -> .'Electric vehicles'[] // as $ (this is implicit)
	where 'fast' -> $ .'Is'?'Fast'

'Top speed': number 'km/h' = .'Car'&'fast' .'Top speed'
Here we used property Car with reference rule fast (this means Car can only have values of Electric vehicles that also have state Fast) to derive Top speed by using the notation .'property'&'where'.
Back to our model, as a state is not a property there is no property to refer to and therefore the notation becomes .&'where'.
Here is the result of ouw efforts in the app:
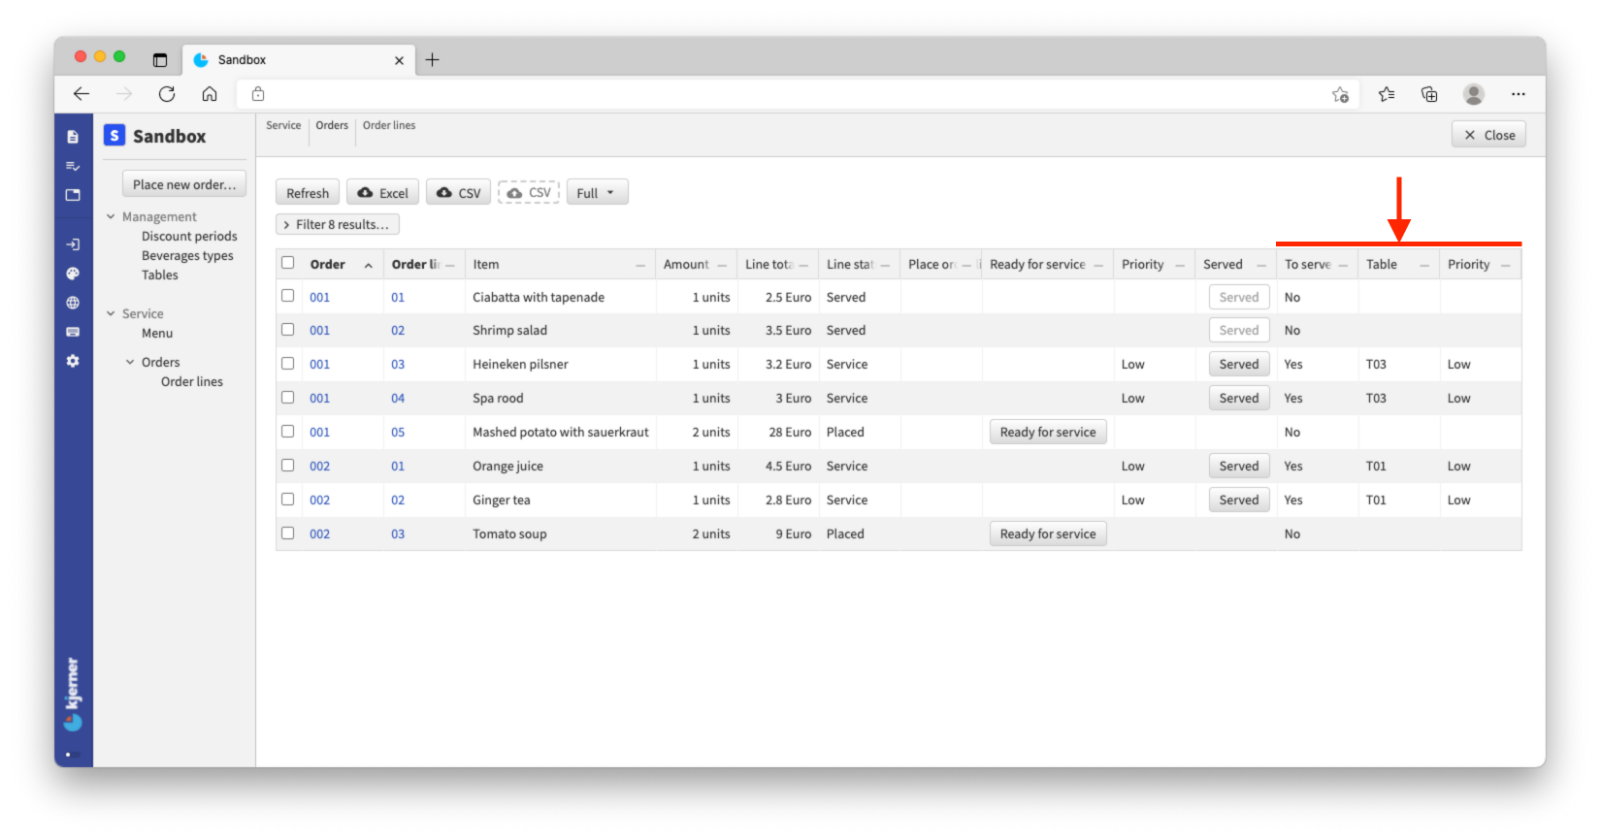
The example is a bit far fetched but it gives a preview into how intricate models can become.
<tutorial folder:
./_docs/tutorials/restaurant1/step_09/>
More advanced references
We haven’t even touched on the subject ‘kitchen’ yet. The kitchen is where ingredients are turned into dishes. Basic ingredients need to be in stock, prices of products need to be monitored, etc. Let’s start easy and create a seperate group Kitchen (between Management and Service), a collection Products and a stategroup that show if a product is a basic ingredient or a composed product (for example a dish):
'Kitchen': group {
	'Products': collection ['Product'] {
		'Product': text
		'Product type': stategroup (
			'Basic ingredient' { }
			'Composed product' { }
		)
	}
}
If it’s a basic ingredient (state Basic ingredient) we would like to register the purchase price and the amount this price refers to, for example 1000 grams of potato’s cost 5 euro:
'Basic ingredient' {
	'Amount': number positive 'units'
	'Purchase price': number 'thousandth eurocent'
}
Also add the new numerical-type thousandth eurocent:
'thousandth eurocent'
	@numerical-type: (
		label: "Euro"
		decimals: 5
	)
This means a number like 500.000 will be represented as “Euro 5,00000”. If later on the purchase cost of for example potato per unit is calculated, by dividing 500.000 by 1.000, the result (“Euro 0,00500”) is accurate enough for further calculations.
A composed product consists of other composed products and/or basic ingredients, for example mashed potato with suaerkraut consists of a composed product potato mash and a basic ingredient sauerkraut. Potato mash consists of the basic ingredients potato, milk and butter in certain quantities. These products all exist as nodes on the same level within our collection Products:
- Mashed potato with sauerkraut (composed product)
- Sauerkraut (basic ingredient)
- Potato mash (composed product)
- Potato (basic ingredient)
- Milk (basic ingredient)
- Butter (basic ingredient)
If a products has state Composed product we want to know a cost price by adding the prices of the ingredients proportionally to the required amount. Let’s first describe that composed products consist of products from the same collection:
'Composed product' {
	'Composed amount': number positive 'units'
	'Ingredients': collection ['Product'] {
		'Product': text -> ^ ^ ^ .'Products'[]
		'Amount': number 'units'
	}
}
Build your model and an error occurs:
‘property’
Productsis a self-reference, but a reference to a sibling is required.
What this means is exactly what we try to accomplish ( a self-reference), but the compiler doesn’t comply and needs ‘a reference to a sibling’. To understand this you first need to know that all nodes in the same collection are siblings: They all ‘live’ on the same level.
To refer to a node from within another node in the same collection we need to apply the word sibling:
'Composed product' {
	'Composed amount': number positive 'units'
	'Ingredients': collection ['Product'] {
		'Product': text -> ^ ^ sibling
		'Amount': number 'units'
	}
}
Be aware that we jump up two levels instead of the three (in the previous reference)! If we want to refer to a sibling a reference is needed to the level of the key of a collection, not to the level of the collection itself.
Next up is the calculation of a price, without taking into account the amount for now, to create the model step by step. Shown below is the group Kitchen we build sofar, including the cost price calculations:
'Kitchen': group {
	'Products': collection ['Product'] {
		'Product': text
		'Product type': stategroup (
			'Basic ingredient' {
				'Amount': number positive 'units'
				'Purchase price': number 'thousandth eurocent'
			}
			'Composed product' {
				'Composed amount': number positive 'units'
				'Ingredients': collection ['Product'] {
					'Product': text -> ^ ^ sibling
					'Amount': number 'units'
					'Price': number 'thousandth eurocent' = ( sibling ) >'Product' .'Cost price'
				}
			}
		)
		'Cost price': number 'thousandth eurocent' = ( sibling ) switch .'Product type' (
			|'Basic ingredient' as $'basic' => $'basic' .'Purchase price'
			|'Composed product' as $'composed' => sum $'composed' .'Ingredients'* .'Price'
		)
	}
}
The price of an ingredient of a composed product is determined by the price that is listed under that product’s cost price. So: 'Price' ... = ... >'Product' .'Cost price' points here:
'Products': collection ['Product'] {
	'Product': text
	'Product type': stategroup (
		'Basic ingredient' { ... }
		'Composed product' {
			...
			'Ingredients': collection ['Product'] {
				...
				'Price': number 'thousandth eurocent' = ( sibling ) >'Product' .'Cost price'	// ----> !!
			}
		}
	)
	'Cost price': number 'thousandth eurocent' = ( sibling ) switch .'Product type' (			// <---- !!
		...
	)
}
And the cost price per product is derived from whether it’s a Basic ingredient or a Composed product. Either we can simply use the Purchase price or we need to sum the prices of all the ingredients that make up the composed product: sum $'composed' .'Ingredients'* .'Price'.
So, in the example of mashed potato with sauerkraut (composed product) the cost price structure looks like this:
- Mashed potato with sauerkraut (composed product)
- Sauerkraut (basic ingredient)
- Potato mash (composed product)
- Potato (basic ingredient)
- Milk (basic ingredient)
- Butter (basic ingredient)
And is detemined like this: €mashed potato with sauerkraut = €sauerkraut + €potato mash = €sauerkraut + ( €potato + €milk + €butter )
Every time a derivation uses information from a sibling we need to tell the compiler it should look for a sibling by adding ( sibling ) (make sure you add the space before and after the word sibling!).
Let’s build the model and find out another error occurs:
no valid ‘dependency location’ found for ‘property’. Unexpected ‘relative object location’: - expected: ‘non sibling entity’ - but found: ‘sibling entity’
And the error points to Cost price in this line:
'Price': number 'thousandth eurocent' = ( sibling ) >'Product' .'Cost price'
Keyword sibling in this line 'Product': text -> ^ ^ sibling solves the problem of not being able to point at a node within the same collection (a user can now say potato mash consists of potato, milk and butter), but also creates a new problem: A user could potentially say that potato mash consists of potato which consists of potato mash, or even worse, that potato mash consists of potato mash itself! Without getting philosophical about whether this is correct or not on an existential level, if a computer would try to calculate the price of potato mash it would end up in an eternal calculation.
The kinds of calculations that use the result of the same calculation are called recursive computations. Like a printer that prints on the back side of its just printed page. It’s convenient, but not if it keeps doing that with the same sheet of paper. We’ll end up with black pages and unreadable text. The printer needs to know when to stop turning the same sheet of paper and load a new sheet for the next printing step.
To avoid never ending calculations and still make use of the strength of these recursive calculations the Alan platform uses graph constraints, a type of constraints that limits the kind of relations (edges) between nodes in a graph (a graph being for example a collection of nodes).
Two graph constraints are implemented on the Alan platform: The acyclic-graph and the ordered-graph. The next image shows a visual representation of the definitions of these graph constraints:
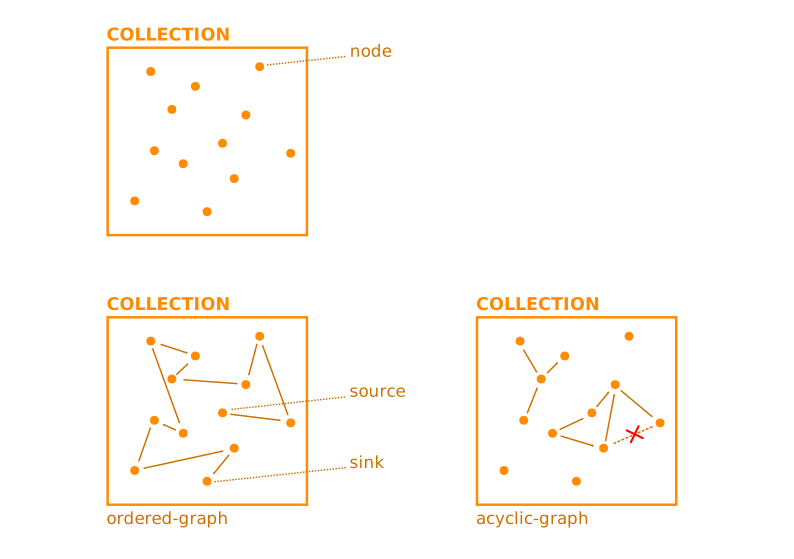
An acyclic-graph constraint constrains nodes from forming a cycle: Every node can have links to (multiple) other nodes, but it’s not allowed to be referenced back to itself. Any loop is forbidden. An ordered-graph constraint is even more strict and constrains all nodes to one single chain, like a train with a locomotive (source) and a final wagon (sink). Obvious examples for an ordered-graph are the days in a month or months in a year: There is a first and a last and in between a consecutive order.
To be very explicit, these constraints do not prevent a user from entering or manipulating data like this:
- In a collection with acyclic-graph constraint:”Potatos consist of eggs and grapefruit, and eggs consist of potato mash and chicken soup”
- In a collection with ordered-graph constraint:”The year starts with month October and ends with month April”
It’s the relations between the nodes in a collection that is constrained, not the content. Most computers have no concept of potato, grapefruit or chicken soup.
Continuing with our model, we need to add an acyclic-graph constraint. This is achieved like this:
'Kitchen': group {
	'Products': collection ['Product']
		'Assembly': acyclic-graph
	{ ... }
And the reference to a sibling needs to be added to this graph Assembly:
'Product': text -> ^ ^ sibling in ('Assembly')
The graph Assembly stores the relations (edges) between all the nodes and makes sure these remain acyclic. In the app either a user can’t select the product that would create a cyclic graph or the app throws an error telling the user it can’t save the selected settings.
Finally the derivations need to be aware of this acyclic-graph constraint and know which graph to consult when performing calculations (so it won’t end up in a never ending loop):
'Price': number 'thousandth eurocent' = ( sibling in ^ ^ 'Assembly' ) >'Product' .'Cost price'
And:
'Cost price': number 'thousandth eurocent' = ( sibling in 'Assembly' ) switch .'Product type' (
	|'Basic ingredient' as $'basic' => $'basic' .'Purchase price'
	|'Composed product' as $'composed' => sum $'composed' .'Ingredients'* .'Price'
)
The app now looks like this:
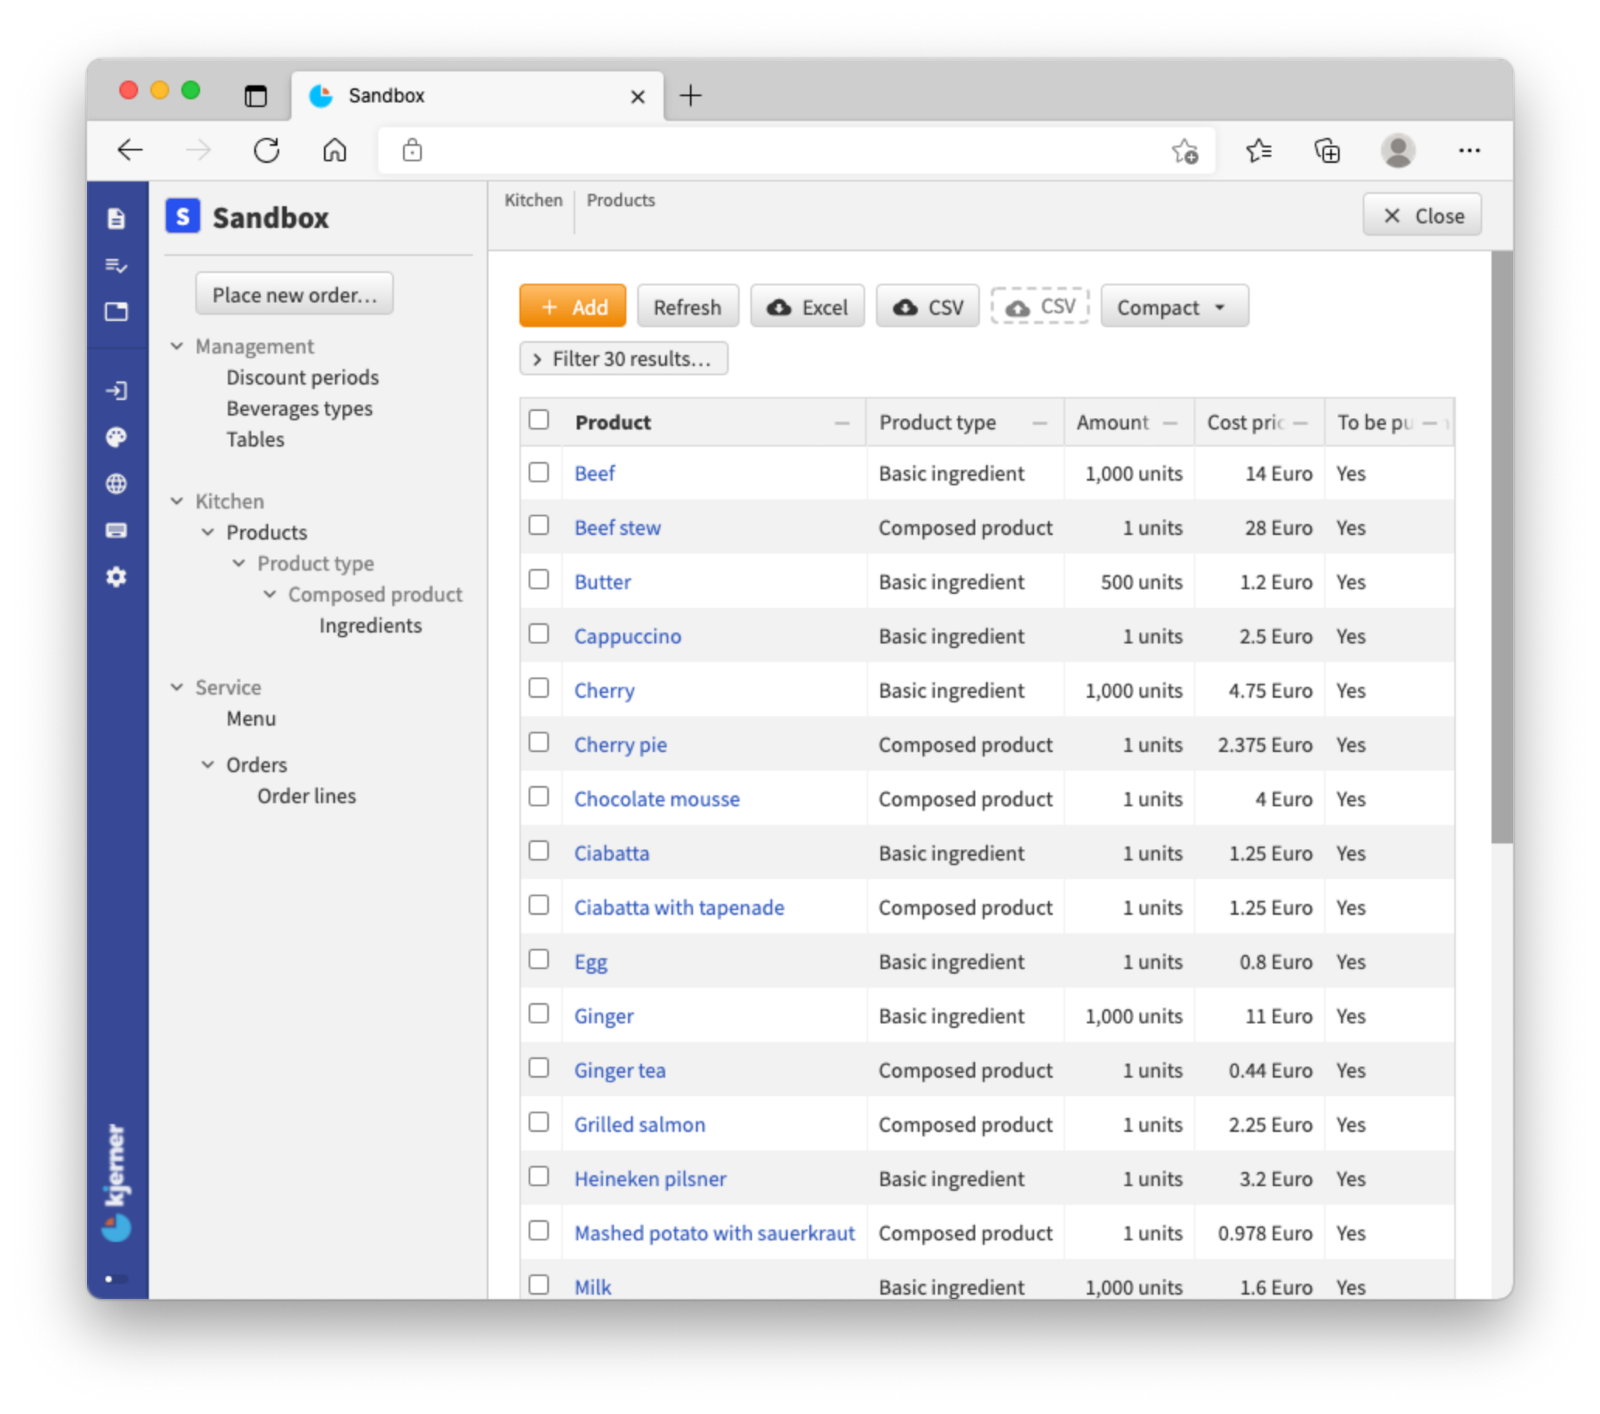
Let’s take a look at Potato mash:
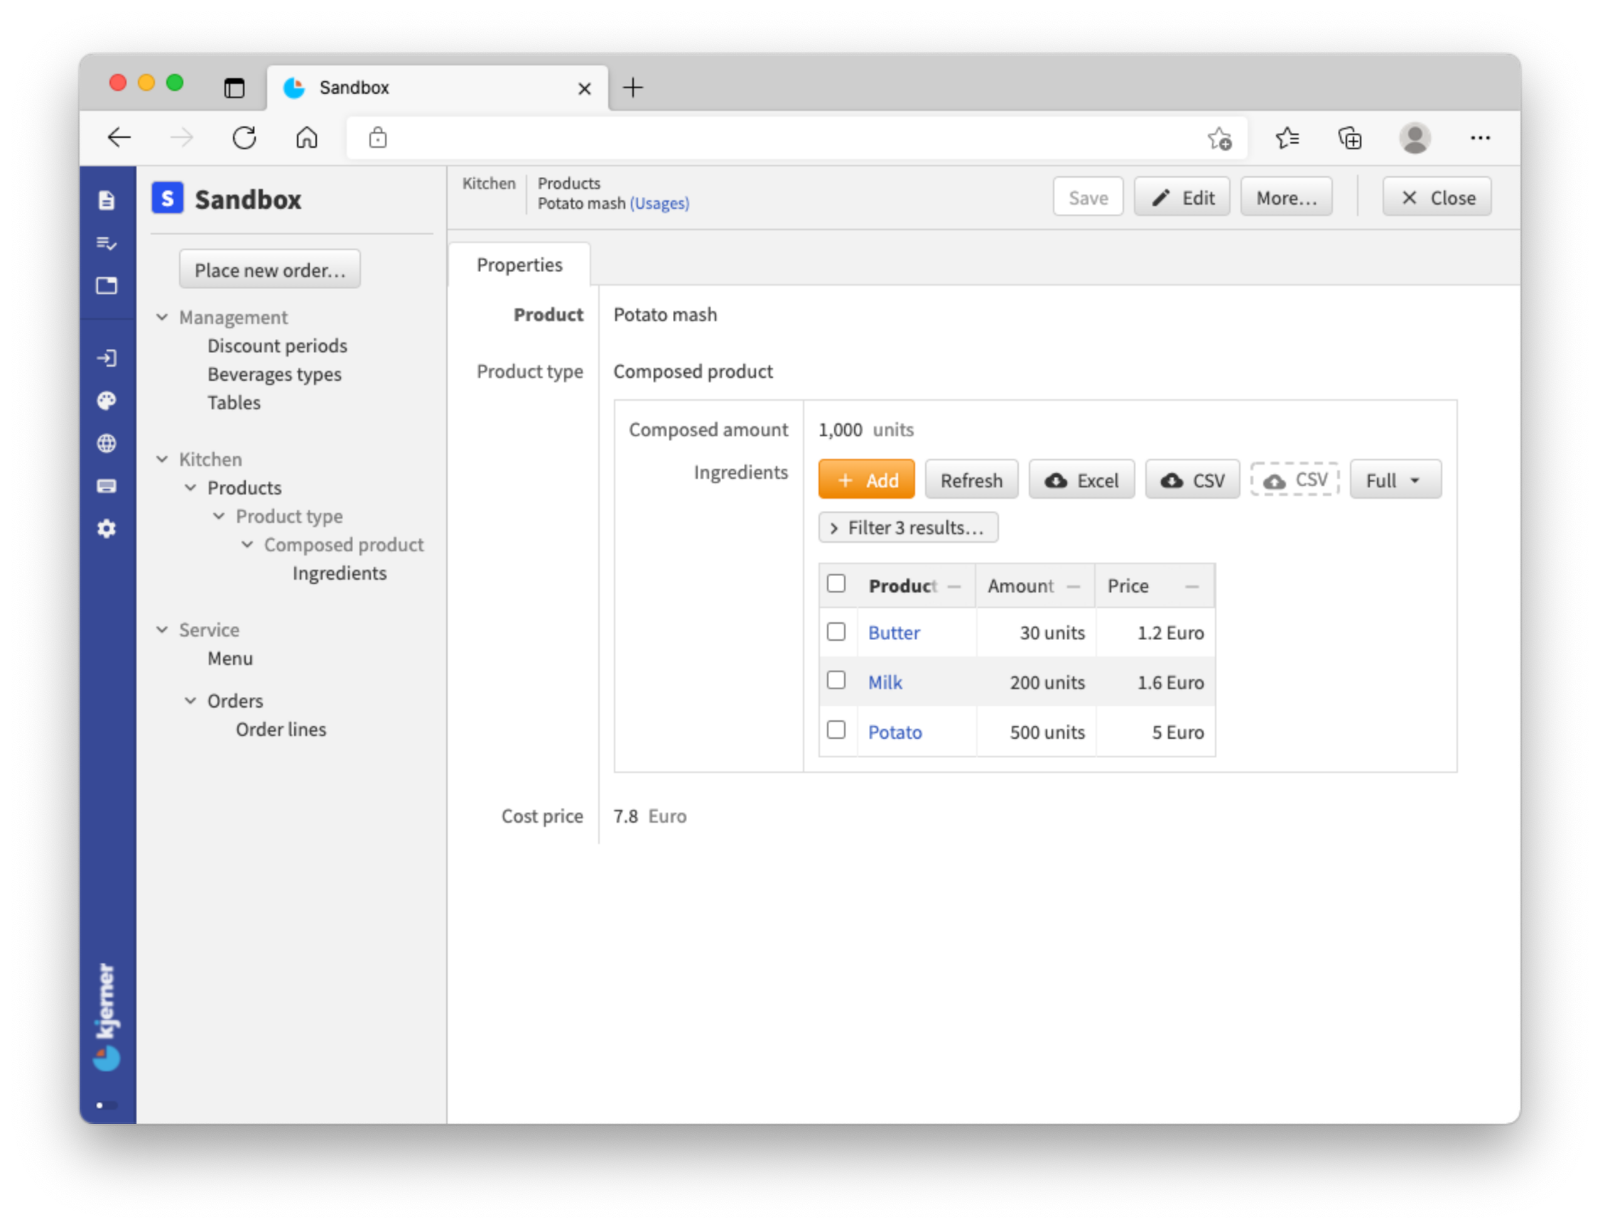 It consists of butter, milk and potato, each products that can also be found in the same collection
 Products. As expected there’s something off with the price: It does not yet take into account the amounts.
For each ingredient we would like to calculate the price for the amount that is used in the composed product. So we change the calculation of Price and add a calculation for Price per unit in collection Ingredients:
'Ingredients': collection ['Product'] {
	'Product': text -> ^ ^ sibling in ('Assembly')
	'Amount': number 'units'
	'Price per unit': number 'thousandth eurocent' = ( sibling in ^ ^ 'Assembly' ) division ( >'Product'.'Cost price' as 'thousandth eurocent' , >'Product'.'Amount' )
	'Price': number 'thousandth eurocent' = ( sibling in ^ ^ 'Assembly' ) product ( .'Price per unit' as 'thousandth eurocent' , .'Amount' )
}
The calculation Price per unit refers to Amount in the node type of the collection Products. This needs to be added and has a similar structure as the derivation of Cost price:
'Amount': number positive 'units' = ( sibling in 'Assembly' ) switch .'Product type' (
	|'Basic ingredient' as $'basic' => $'basic' .'Amount'
	|'Composed product' as $'composed' => $'composed' .'Composed amount'
)
Price per unit is determined by dividing the cost price of the ingredient by the (purchased) amount. Price is then the product of this Price per unit and the amount required in the composed product. The Cost price remains the same: Purchased price for basic ingredients and Price for composed products.
Amounts all have units for unit. This can be kilogram, gram, liter, pieces, etc. Deriving the amount of a composed product from its ingredients (similar to the derivation of the price) would require us to know specific volumes or masses of all the ingredients. Then we would be able to calculate how they add up to the weight or volume of the composed product. We won’t get into this part in this tutorial. The units of a composed product need to be added by the user.
Be aware to also add to numerical-type thousandth eurocent the product and division conversion rules (in that order):
'thousandth eurocent'
	= 'thousandth eurocent' * 'units'
	= 'thousandth eurocent' / 'units'
	@numerical-type: (
		label: "Euro"
		decimals: 5
	)
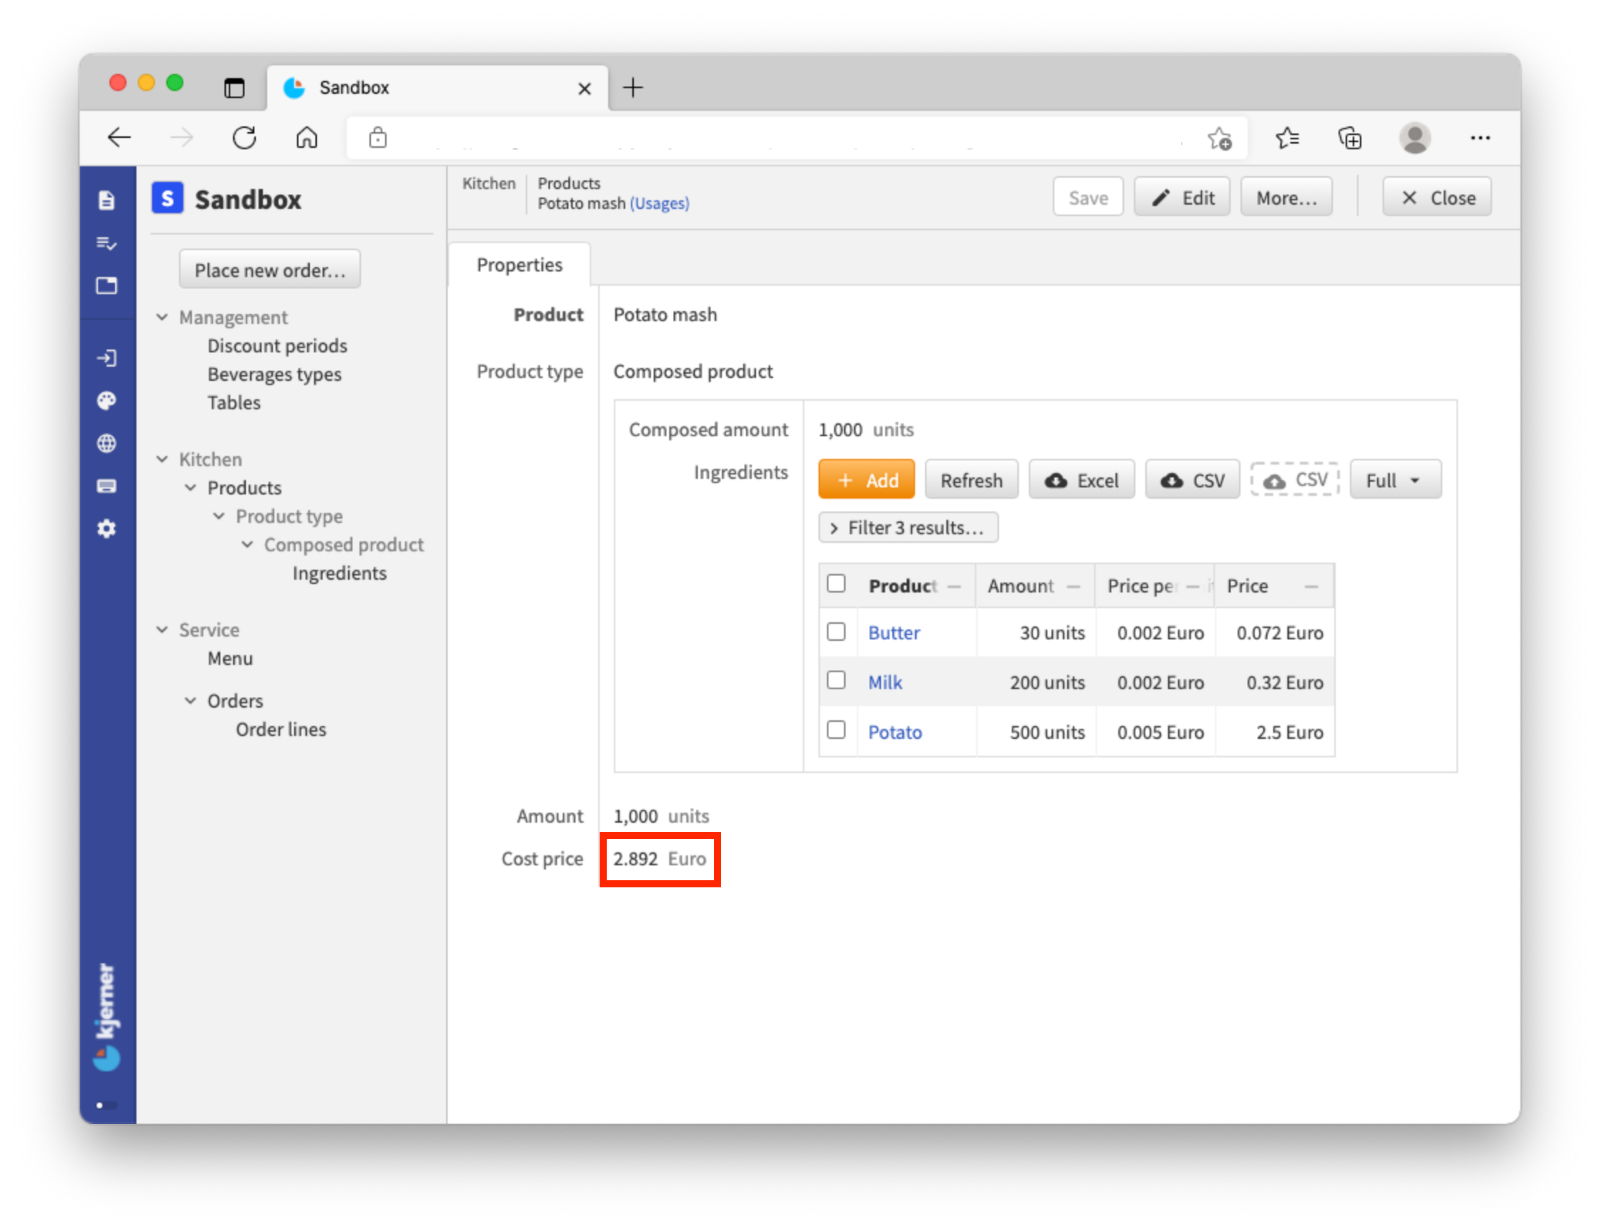
Our potato mash now costs less, because the ingredients cost less:
To end this topic, we can add a stategroup To be put on menu in the collection Products, to specify for each product if it can be ordered by a customer:
'To be put on menu': stategroup (
	'Yes' { }
	'No' { }
)
In the collection Menu within group Service the key Item name now can refer to this collection Products and specifically to the state Yes of stategroup To be put on menu:
'Item name': text -> ^ ^ .'Kitchen' .'Products'[]
	where 'menu item' -> $ .'To be put on menu'?'Yes'
(NOTE: as $ is implicit, after the reference constraint in the first line)
The definition of Item name is extended with a reference to the collection Products and a where rule that more specifically states that only products with the state Yes can be used as Item name.
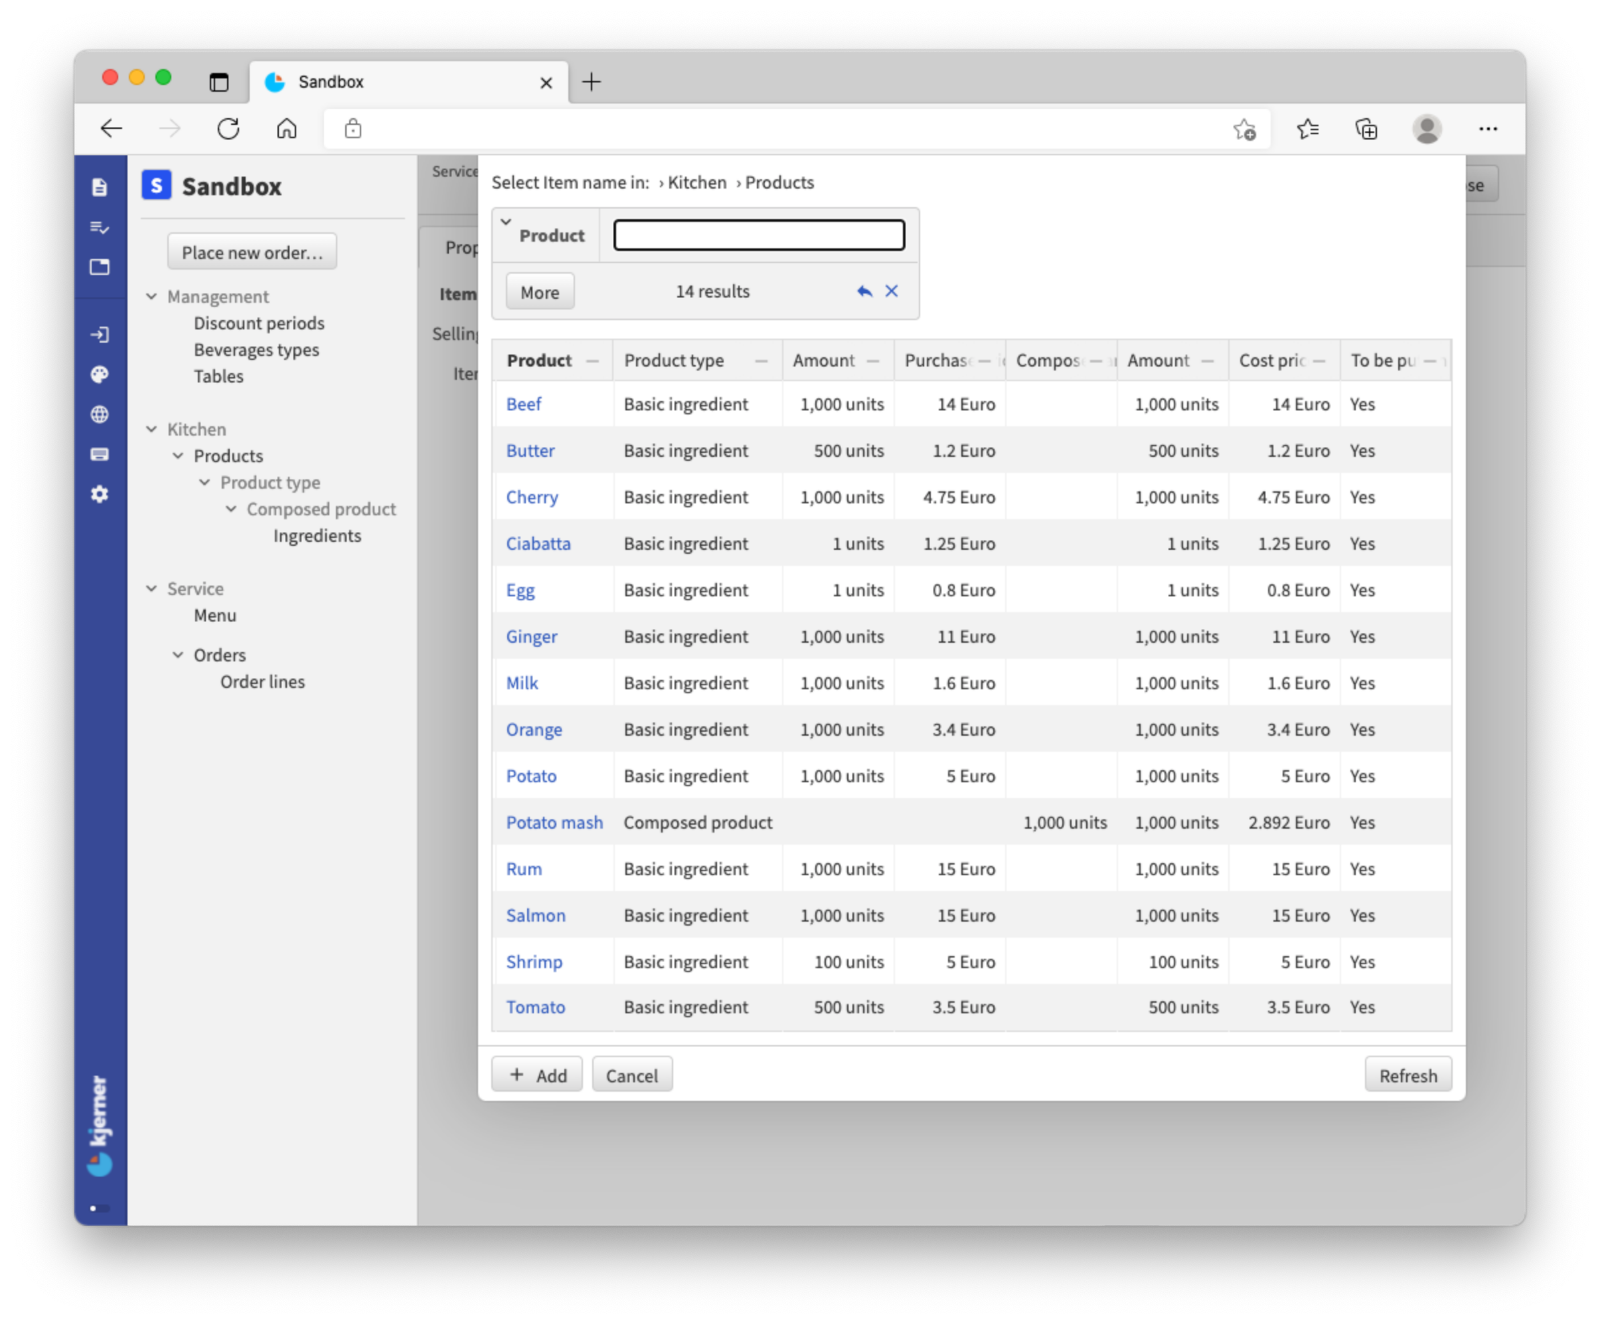
If you want to add an item to the menu, you can now select from a list:
<tutorial folder:
./_docs/tutorials/restaurant1/step_10/>