Application Tutorial:
a Restaurant app
Part II
- Introduction
- Take-away
- Derived values
- Growing our business
- Conditional expressions
- Usages and reference sets
- Commands and actions
- The End
Introduction
This is the second part of the application language tutorial where we build a restaurant app. Make sure that you have completed the first part before continuing.
Let’s recap: in the first part, we wrote a small data model for our restaurant. From that data model, we generated a web application for entering a menu, tables, and orders. In this second part you will learn about derived values and commands & actions.
Take-away
You decided that your restaurant will also provide a take-away service. For that, we have to make adjustments to the model. Let’s see what is needed.
Orders will no longer be part of Tables: we can have Orders without Tables.
But, for an Order, we do want to know if it is a Takeaway order, or if it is an In-house order for a table.
For that, we add an Order type.
So, we rewrite this piece of code:
'Tables': collection ['Table number'] {
	'Table number': text
	'Seatings': number 'chairs'
	'Orders': collection ['Order line'] {
		'Order line': text
		'Item': text -> ^ ^ .'Menu'[]
		'Amount': number 'units'
	}
}
to this:
'Tables': collection ['Table number'] {
	'Table number': text
	'Seatings': number 'chairs'
}

'Orders': collection ['Order'] {
	'Order': text
	'Order type': stategroup (
		'Takeaway' { }
		'In-house' {
			'Table': text -> ^ ^ .'Tables'[]
		}
	)
	'Order lines': collection ['Order line'] {
		'Order line': text
		'Item': text -> ^ ^ .'Menu'[]
		'Amount': number 'units'
	}
}
What changed?
- We moved
Ordersone level up, to theroot. - Previously, we had a list of
Order linesper table. That is inconvenient, because we want to know whichOrder linesbelong to the same order. Therefore, we updated our model to express thatOrdershave a collection ofOrder lines. - We’ve added a stategroup
Order typewith two possible states:TakeawayorIn-house - For
In-houseOrders, we also want to know for whichTablethey are. Therefore,In-houseorders now have aTableattribute, that references aTablesitem.
Derived values
Our customers have to pay us, and for that we need to compute the cost of their orders.
Let’s start with a Line total: the cost of a single Order line.
The Line total of an Order line is a derived value, computed from the (base values) Selling price and the Amount:
'Order lines': collection ['Order line'] {
	'Order line': text
	'Item': text -> ^ ^ .'Menu'[]
	'Amount': number 'units'
	'Line total': number 'eurocent' = product (
		>'Item'.'Selling price' as 'eurocent' ,
		.'Amount'
	)
}
After eurocent for the Line total we have have written a formula for deriving the Line total of an Order line.
The formula (derivation expression) expresses that the Line total is computed by multiplying (taking the product of) the Selling price and Amount.
For retrieving the Selling price of the Item we use the notation >'Item'.
That means, starting at the Order lines node, follow the Item reference (expressed by -> ^ ^ .'Menu'[]).
So, at runtime, >'Item' gives us the Menu item that corresponds to an Order line.
After Selling price, there is some special code: as 'eurocent'.
To explain what this means and for the health of our model we need to add this line:
= 'eurocent' * 'units' below euro so our numerical-types section now looks like this:
numerical-types
	'eurocent'
		= 'eurocent' * 'units'
		@numerical-type: (
			label: "Euro"
			decimals: 2
		)
	'chairs'
	'units'
The as keyword is followed by a product conversion rule.
Such a rule describes how numerical-types of the two properties are multiplied, like euro and unit.
So the general format of a product conversion rule is = 'num-type1' * 'num-type2'.
The first part ('num-type1') is wat we mention after the keyword as.
For a division the as keyword is followed by a division conversion rule indicated by the / in place of the * keyword.
NOTE: for future versions of Alan, we plan to let the compiler infer this.
For converting number values with a constant factor, you can use the from keyword followed by the name of a singular conversion rule, like 'diameter':
root {
	'Circle diameter': number 'diameter'
	'Circle circumference': number 'circum' = from 'diameter' .'Circle diameter'
}
numerical-types
	'diameter'
	'circum'
		= 'diameter' * 314159265 * 10 ^ -8	// = diameter * pi
In the example, diameter refers to the singular conversion rule on the last line.
Conversion rules ensure that numerical-types for derived values are correct.
Also, they enable reuse of (singular) conversions.
Let’s add another useful line to the model:
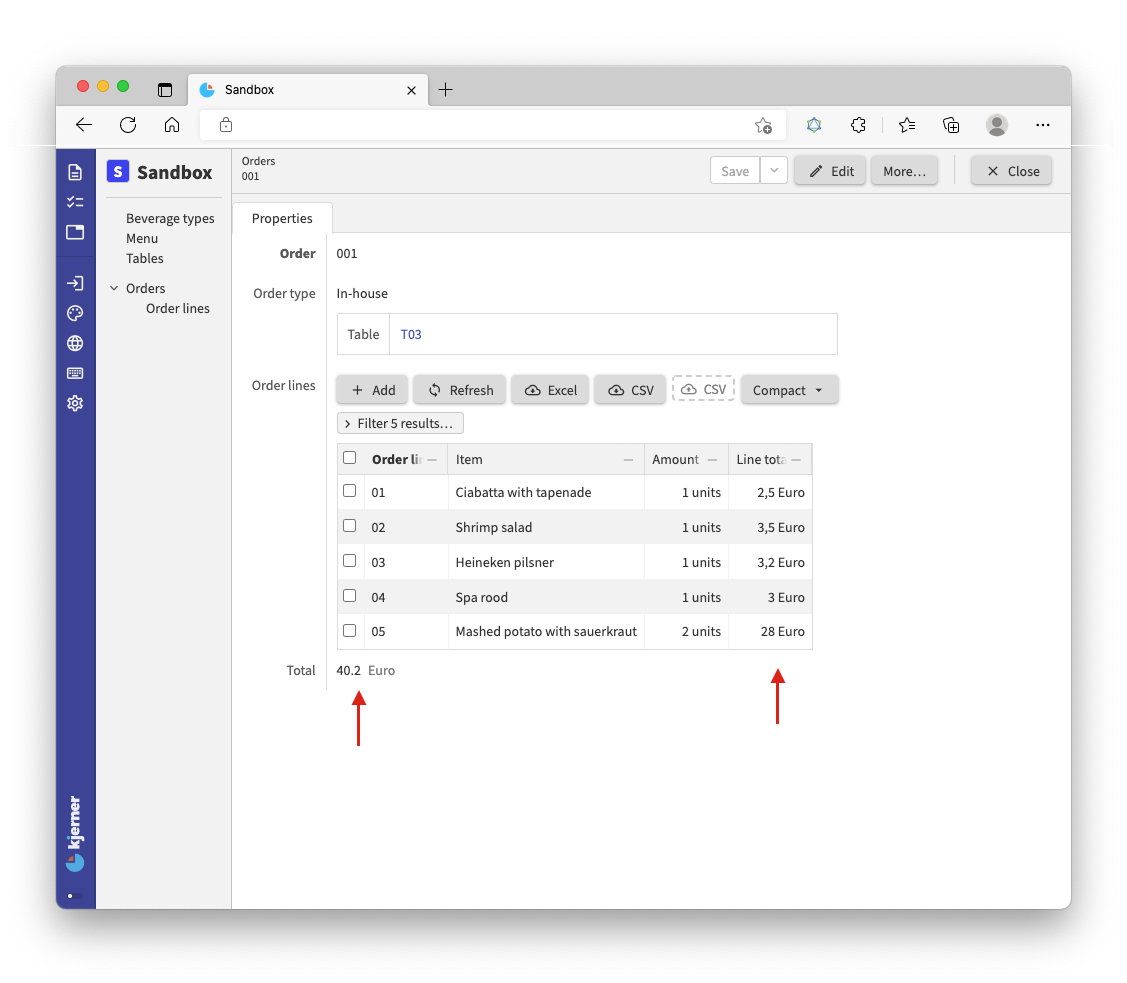
'Total': number 'eurocent' = sum .'Order lines'* .'Line total'
This line expresses that Total is the sum of the Line total from a set of Order lines.
For that purpose, the expression starts with the keyword sum, followed by a path that produces a set of numbers to sum.
The grammar calls this an object set path.
The object set path starts with navigation steps that lead to a collection: .'Order lines'.
Subsequently, the keyword * expresses expansion of the collection to a set of objects: Order line nodes.
The expression concludes with a value path (.'Line total') expressing which value from each Order line should be retrieved.
Can you determine where the line needs to go? Spoiler alert: answer ahead…
So now our whole model looks like this:
users
	anonymous

interfaces

root {
	'Beverage types': collection ['Beverage type'] {
		'Beverage type': text
	}

	'Menu': collection ['Item name'] {
		'Item name': text
		'Selling price': number 'eurocent'
		'Item type': stategroup (
			'Dish' {
				'Dish type': stategroup (
					'Appetizer' { }
					'Main course' { }
					'Dessert' { }
				)
			}
			'Beverage' {
				'Beverage type': text -> ^ ^ .'Beverage types'[]
			}
		)
	}

	'Tables': collection ['Table number'] {
		'Table number': text
		'Seatings': number 'chairs'
	}

	'Orders': collection ['Order'] {
		'Order': text
		'Order type': stategroup (
			'Takeaway' { }
			'In-house' {
				'Table': text -> ^ ^ .'Tables'[]
			}
		)
		'Order lines': collection ['Order line'] {
			'Order line': text
			'Item': text -> ^ ^ .'Menu'[]
			'Amount': number 'units'
			'Line total': number 'eurocent' = product (
				>'Item'.'Selling price' as 'eurocent' ,
				.'Amount'
			)
		}
		'Total': number 'eurocent' = sum .'Order lines'* .'Line total' // <-- ;-)
	}
}

numerical-types
	'eurocent'
		= 'eurocent' * 'units'
		@numerical-type: (
			label: "Euro"
			decimals: 2
		)
	'chairs'
	'units'
And at runtime (in your app) it looks like this:
Note that operations such as sum work on both a set of values as well as on a list of values.
For summing a list of separate values, you use parentheses after the sum keyword, as we did for product:
sum ( .'value A', .'value B', .'value C', .'value D' )
The supported operations for deriving number values can be found here.
sum: determines the sum of a set or list of valuesmin: determines the minimum of a set or list of valuesmax: determines the maximum of a set or list of valuesstd: determines the standard deviation of a set of valuescount: counts the number of values in a setremainder: computes the remainder of a division (10 mod 3 = 1)division: computes the division of two numbersadd: computes the addition of two numbersdiff 'date': computes the difference of two (relative!) numbers, for example the difference between two dates or two temperatures
Examples of absolute and relative numbers:
- (number of) days: absolute, “28 days”
- date: relative, “28-7-2021”
- years: absolute, “5 years”
- year: relative, “2021”
- degrees: absolute, “21 degrees”
- temperature: relative, “21˚C”
- seconds, minutes, hours: absolute, “2 hours, 35 minutes and 8 seconds” (duration)
- time of day or ‘the time’: relative “14:35:08”
So far we’ve seen number derivations, but we can also derive other types of data.
<tutorial folder:
./_docs/tutorials/restaurant1/step_04a/>
Growing our business
Our restaurant business is growing.
Many people are now working with our app, and its time for some reorganization.
We have more permanent data that only Management should touch, and we want to show that in our application.
For that, we express a group called Management at the top of the model.
This group captures a new collection Discount periods, a VAT percentage, and the existing collections Beverages types and Tables as shown below.
When rebuilding the app, you’ll get some errors saying the compiler can’t find certain properties.
Correct the errors according to the changes made, by adding missing navigation steps such as .'Management'.
'Management': group {
	'Discount periods': collection ['Period'] {
		'Period': text
		'Percentage' : number 'percent'
		'Minimal spendings': number 'eurocent'
	}
	'VAT percentage': number 'percent'
	'Beverage types': collection ['Beverage type'] {
		'Beverage type': text
	}
	'Tables': collection ['Table number'] {
		'Table number': text
		'Seatings': number 'chairs'
	}
}
The VAT percentage will be used for computing the value added tax (VAT).
For the VAT percentage, we also have to add a numerical type to the numerical-types section in the model:
'percent'
The Discount periods are for discounts during different time periods, where the discount depends on the amount of money spent at the restaurant.
Rename the attribute Total for Orders to Subtotal:
'Subtotal': number 'eurocent' = sum .'Order lines'* .'Line total'
The actual Total cost will depend on a discount when applicable.
<tutorial folder:
./_docs/tutorials/restaurant1/step_05/>
Conditional expressions
Now, let’s add a stategroup Discount applicable to Orders.
Note that we also need to update the numerical-types section with the new numerical type fraction, a corresponding product conversion rule, and a singular conversion rule percent:
'Discount applicable': stategroup (
	'Yes' {
		'Discount period': text -> ^ ^ .'Management'.'Discount periods'[]
		'Discount': number 'eurocent'
			= switch ^ .'Subtotal' compare ( >'Discount period'.'Minimal spendings' ) (
				| < => 0
				| >= => product (
					from 'percent' >'Discount period'.'Percentage' as 'fraction',
					^ .'Subtotal'
				)
			)
		'Total': number 'eurocent' = sum ( ^ .'Subtotal' , - .'Discount' )
	}
	'No' { }
)
...
numerical-types
	'eurocent'
		= 'units' * 'eurocent'
		= 'fraction' * 'eurocent'
		@numerical-type: (
			label: "Euro"
			decimals: 2
		)
	'chairs'
	'units'
	'percent'
	'fraction'
		= 'percent' / 1 * 10 ^ 2
With this model extension, you can apply a discount by selecting a Discount period from the previously added collection Discount periods.
For example, selecting ‘Summer holiday’ will give a 3% discount on spendings over €35.
If a discount is applicable (state Yes) and a Discount period is selected, the Discount will be computed after saving your changes, as follows:
- Compare the
Subtotalwith theMinimal spendingsthat belong to the selectedDiscount period - If
Subtotalis smaller thanMinimal spendingsthenDiscountwill be equal to 0 - If
Subtotalis bigger than or equal toMinimal spendingsthen theDiscountwill be computed using the correspondingPercentage. ThePercentageis first converted frompercenttofraction(from 3% to 0.03). TheDiscountis then computed as theproductof the computedfractionand theSubtotal.
The Total cost is computed by subtracting Discount from the Subtotal using the sum operation and a sign inversion (-).
With the switch expression for the Discount, you switch on the comparison (compare) result of two numbers.
We can match against the following possible results for the comparison:
- ‘greater than’ (
>) - ‘greater than or equal to’ (
>=) - ‘less than’ (
<) - ‘less than or equal to’ (
<=) - ‘equal to’ (
==) - ‘less than or greater than’ (
<>)
Cases may not overlap, so you cannot match against < as well as <=.
Let’s take a look at the app and enter an order:
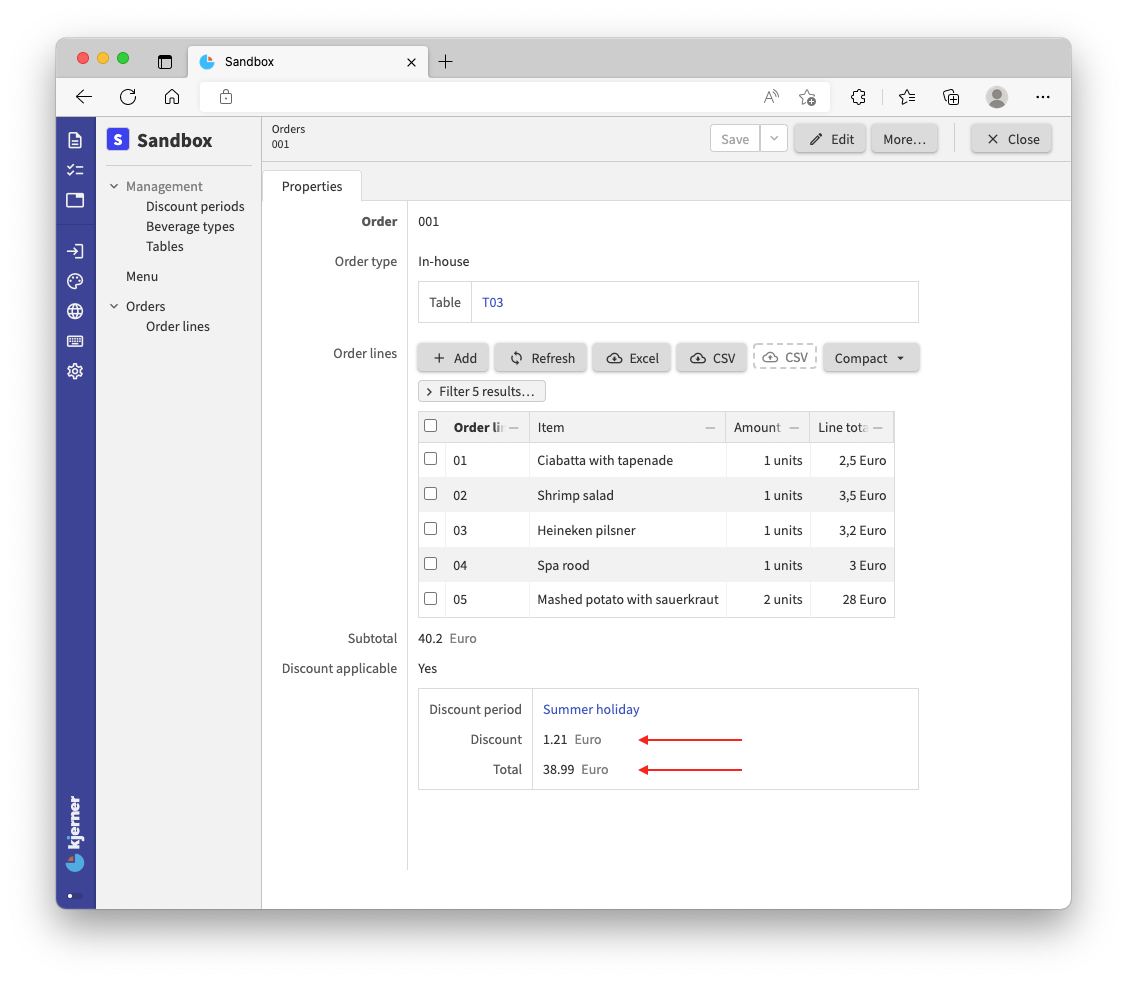 An order with a subtotal of €40,20 receives a discount of 3% when spending €35 or more during the summer holiday.
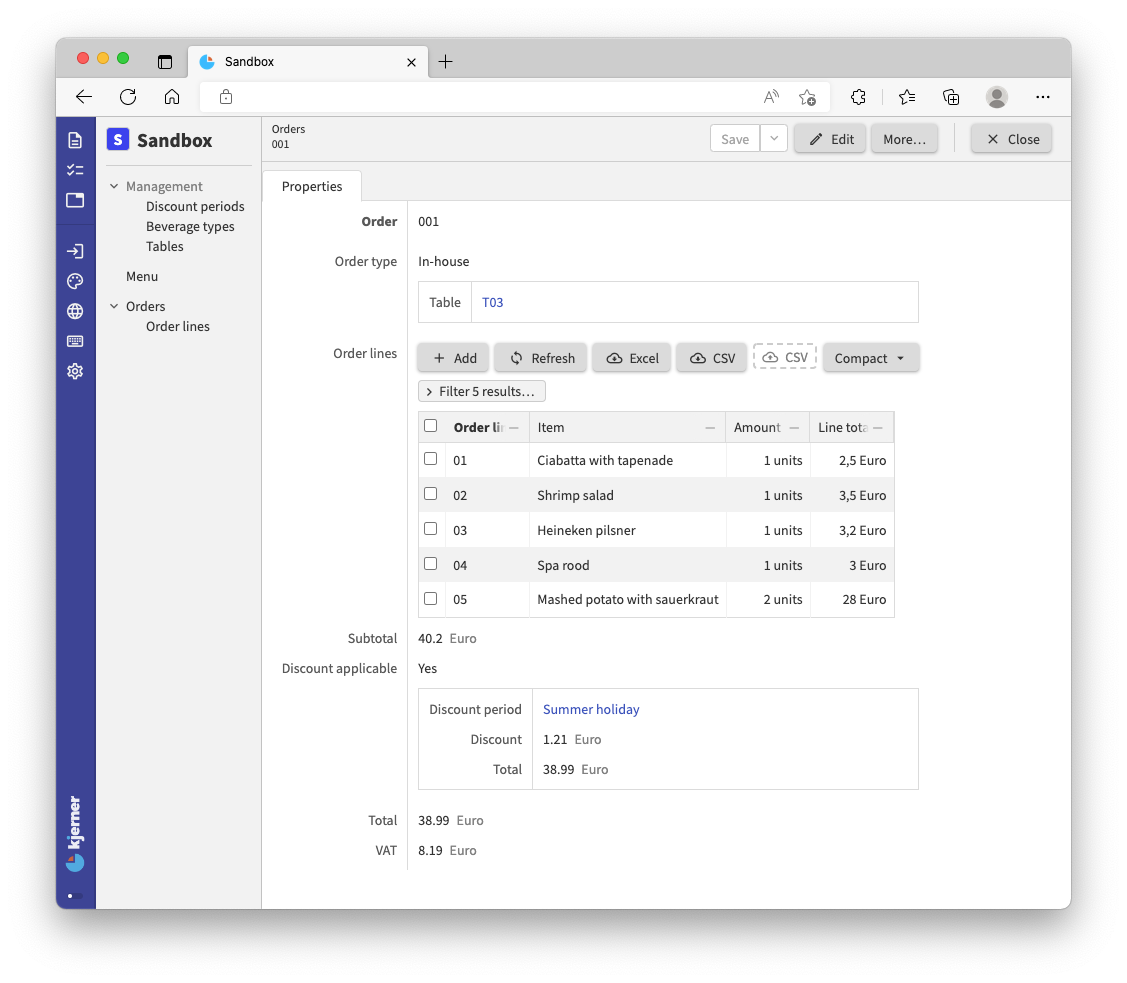
Now, let’s compute the tax (VAT).
To do this we need to know the Total cost and take a percentage of it.
But, the actual Total cost of an Orders item depends on whether a discount was applied or not.
For that purpose, we use a switch statement for switching on the state of a stategroup attribute, after which we can compute the VAT from the Total of the order:
'Total': number 'eurocent' = switch .'Discount applicable' (
	|'Yes' as $'discount' => $'discount'.'Total'
	|'No' => .'Subtotal'
)
'VAT': number 'eurocent' = product (
	from 'percent' ^ .'Management' .'VAT percentage' as 'fraction' ,
	.'Total'
)
For computing the Total, we switch on the state of Discount applicable.
In case of state Yes we use a special instruction as $'discount'.
This stores the Yes node under the name $'discount'.
Because of that, we can refer to it in the remaining part of the expression (and only there): $'discount'.'Total'.
We call this a named object (or constant variable).
Here’s the result of our work:
For each property type that the application language supports, the language also supports expressing for deriving such values.
So, you can derive text values, file values, references, stategroup states, and even collections.
You can find many examples in the application language documentation.
<tutorial folder:
./_docs/tutorials/restaurant1/step_06/>
Usages and reference sets
References are by default unidirectional.
However, it is often useful to ‘invert’ those references: for Tables we may want to know which Orders have been placed for it.
You may have noticed the Usages button in your app, when viewing a Tables item.
Clicking on Usages, gives you a screen with exactly that information: which Orders were placed for the Tables item.
Let’s try that with a new order.
Select Orders in the left column and click ‘Add’ (note that you can currently not ‘Add’ items from the Usages screen directly):
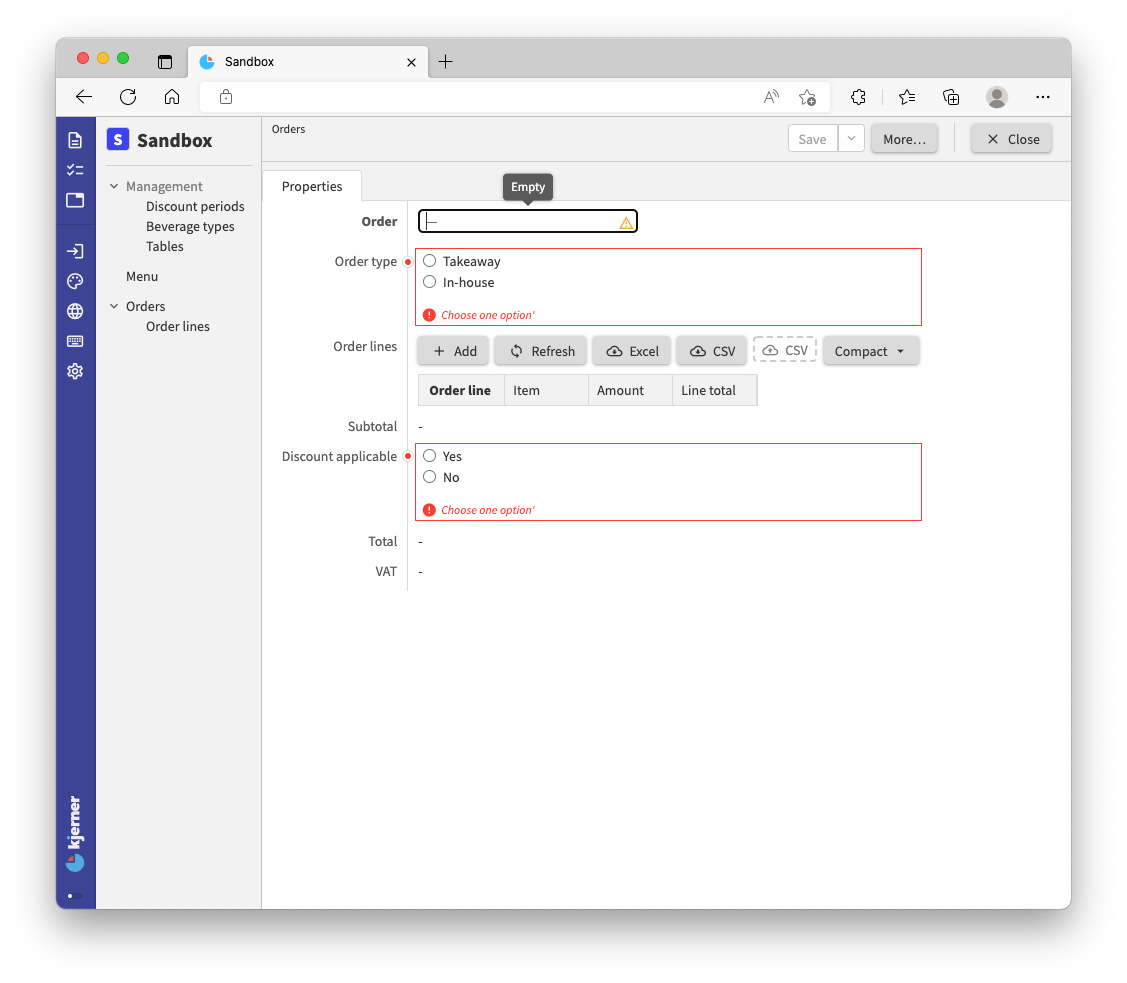
Insert ‘001’ as the order number, choose In-house and select a table.
Just for fun, add some order lines as well:

Now, hit Save!
Go to Tables, pick the table you selected when placing the order and click Usages:
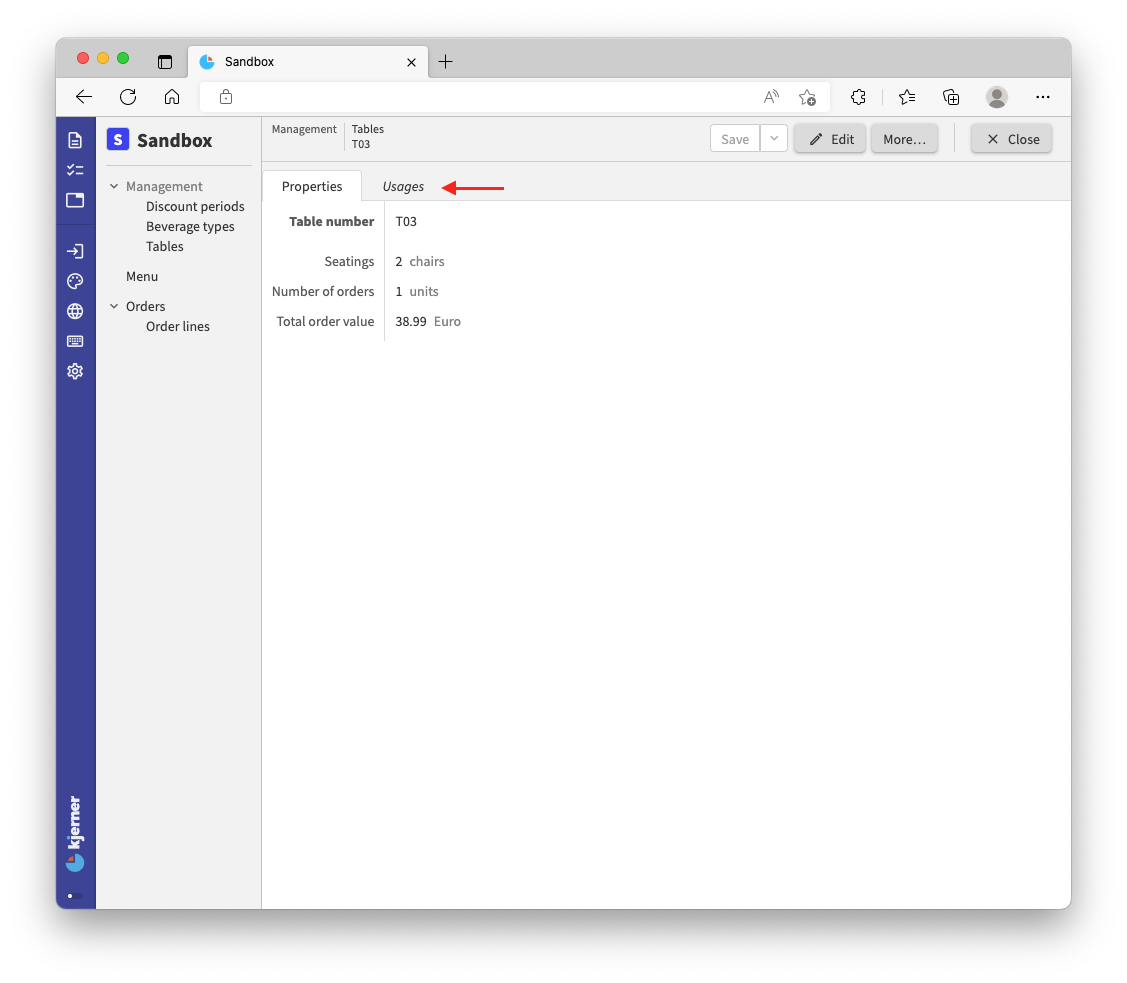
We can see that in our version Order ‘001’ is using table ‘T03’:
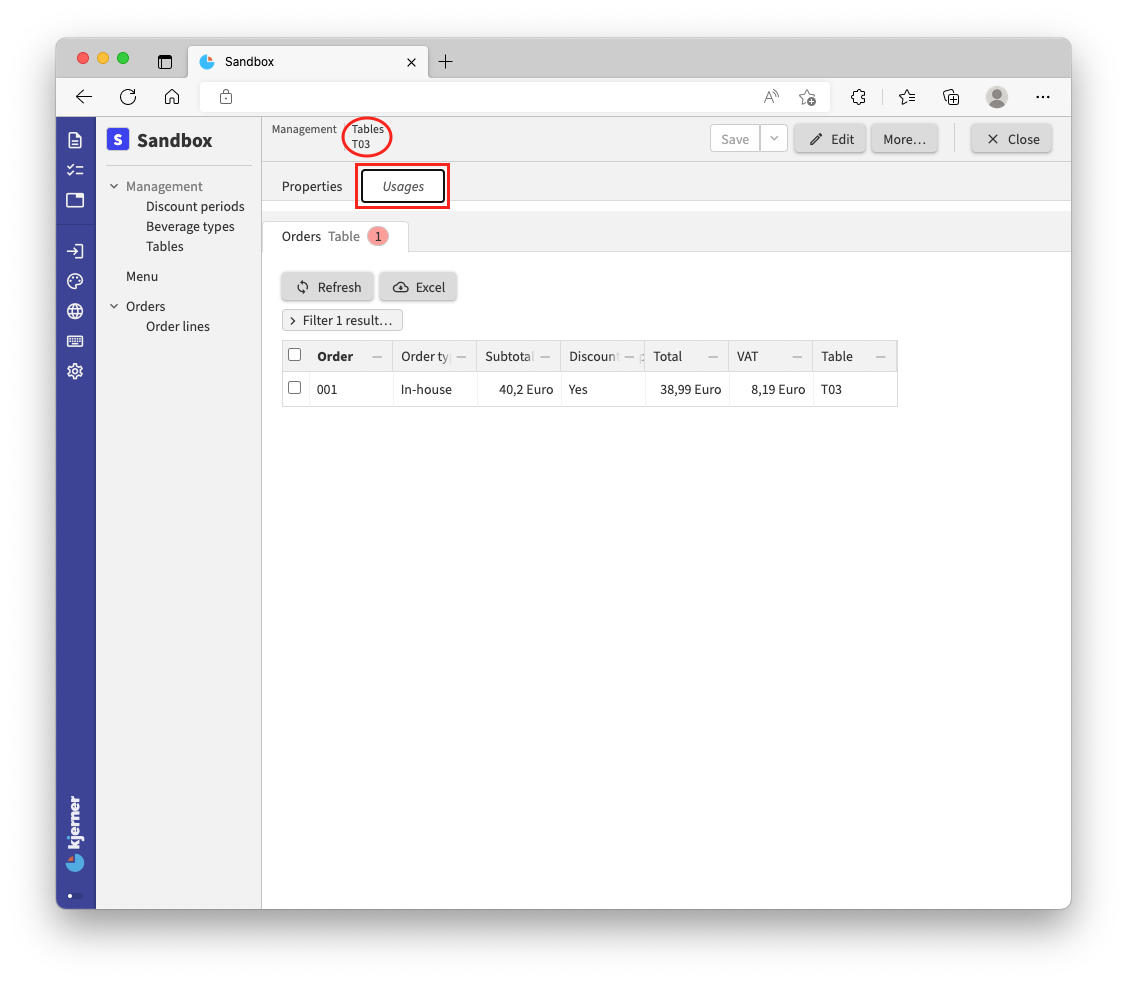
If we click the order, we jump to the order with its order lines.
In the web app, we have this nice ‘Usages’ screen. The web app computes these screens for us. However, we cannot use these ‘Usages’ in computations. For that, we need bidirectional references.
You can turn unidirectional references into bidirectional references with a reference set. A reference set holds inverse references, which are identical to the usages that we just saw. Let’s add that reference set, and some derivations that use it:
'Tables': collection ['Table number'] {
	'Table number': text
	'Seatings': number 'chairs'
	'Orders': reference-set -> downstream ^ ^ .'Orders'* .'Order type'?'In-house' = inverse >'Table'
	'Number of orders': number 'units' = count <'Orders'*
	'Total order value': number 'eurocent' = sum <'Orders'* ^ .'Total'
}
Also, add -<'Orders' at the Table reference below 'In-house' in your model.
'Table': text -> ^ ^ ^ .'Management' .'Tables'[] -<'Orders'
Now, build it and take a look at the app.
For each Tables node we can now see how many Orders have been placed at that table.
Furthermore, we can see the Total order value for the Orders placed at a specific table.
Nice stats that may enable us to optimize the placement of our Tables.
For expressing the reference set, we use a special keyword downstream followed by a navigation path.
The keyword downstream indicates that the reference-set holds references to nodes that are later defined in your model.
For normal references that use reference later defined attributes, it is required as well.
In our experience, well designed application models rarely require the downstream, except for reference-set attributes.
If the downstream keyword is required, you can often reorder properties in your model to prevent it.
In other cases, we often find that a model contains a dependency that requires our attention/should be changed.
The navigation path contains the keyword * instead of [] that we saw for unidirectional references.
That is because multiple Orders can reference the same table; the reference-set for a specific table will hold all Orders that refer to that specific table.
Finally we say: take the inverse of the Table reference that you find under In-house.
For Table, we expressed that for the reference, its inverse (-< instead of ->) should be stored in the reference set Orders of the Tables item.
<tutorial folder:
./_docs/tutorials/restaurant1/step_06a/>
Commands and actions
When we build Alan applications, we often connect them to other systems that send information.
For example, suppose that we need to connect our restaurant application to a third party app for placing orders.
We then typically define an Alan interface (which looks a lot like an application), expressing which commands the third party app can send.
For example, a command Place new order for placing a new order.
Our app needs to implement the Place new order command for it to work.
We do that with application language.
NOTE: discussing the Alan interface language goes beyond the scope of this tutorial.
If you would like to see a tutorial about the Alan interface language, and interconnecting multiple different applications, please let us know on the forum.
Alternatively, we need a user interfaces that works well on a mobile device with clickable buttons to execute operations.
In addition, users may need to perform multiple different operations on data in sequential manner to complete a task.
For that purpose, Alan supports action’s.
Commands and actions are nearly identical with regard to how you express them. But, commands are executed on the server, whereas actions are executed on the client (by your web application). Which of the two you should choose depends entirely on your use case, as illustrated above.
Now let’s look at our implementation of Place new order for the third party app:
'Place new order': command {
	'Provide an order number': text
	'Where is the meal consumed?': stategroup (
		'Outside of restaurant' { }
		'At the restaurant' {
			'Where is the customer seated?': text -> .'Management'.'Tables'[]
		}
	)
	'Order lines': collection ['Provide an order line number'] {
		'Provide an order line number': text
		'Item to be consumed': text -> .'Menu'[]
		'Amount of this item': number 'units'
	}
} => update .'Orders' = create (
	'Order' = @ .'Provide an order number'
	'Order type' = switch @ .'Where is the meal consumed?' (
		|'Outside of restaurant' => create 'Takeaway' ( )
		|'At the restaurant' as $ => create 'In-house' (
			'Table' = $ .'Where is the customer seated?'
		)
	)
	'Order lines' = walk @ .'Order lines' as $ (
		create (
			'Order line' = $ .'Provide an order line number'
			'Item' = $ .'Item to be consumed'
			'Amount' = $ .'Amount of this item'
		)
	)
	'Discount applicable' = create 'No' ( )
)
That’s a lot to take in!
Let’s take a look at the result in the webbrowser.
Add the code to your model at the bottom, on the root type.
Then, build the app and go to your browser.
In the left column a button ‘Place new order…’ appears:
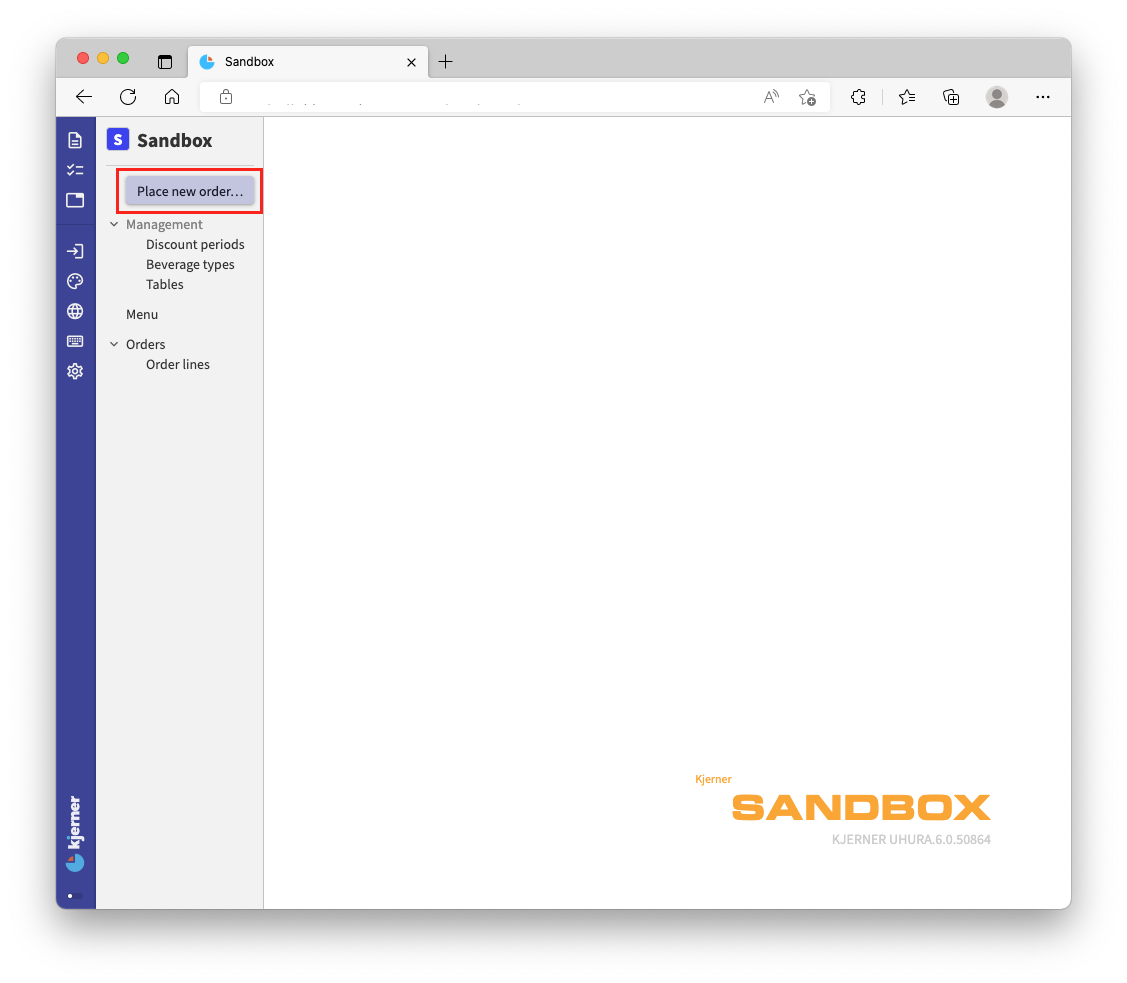
The title of this button corresponds to the label of our command: Place new order
Click it and fill in the fields, for example like this:
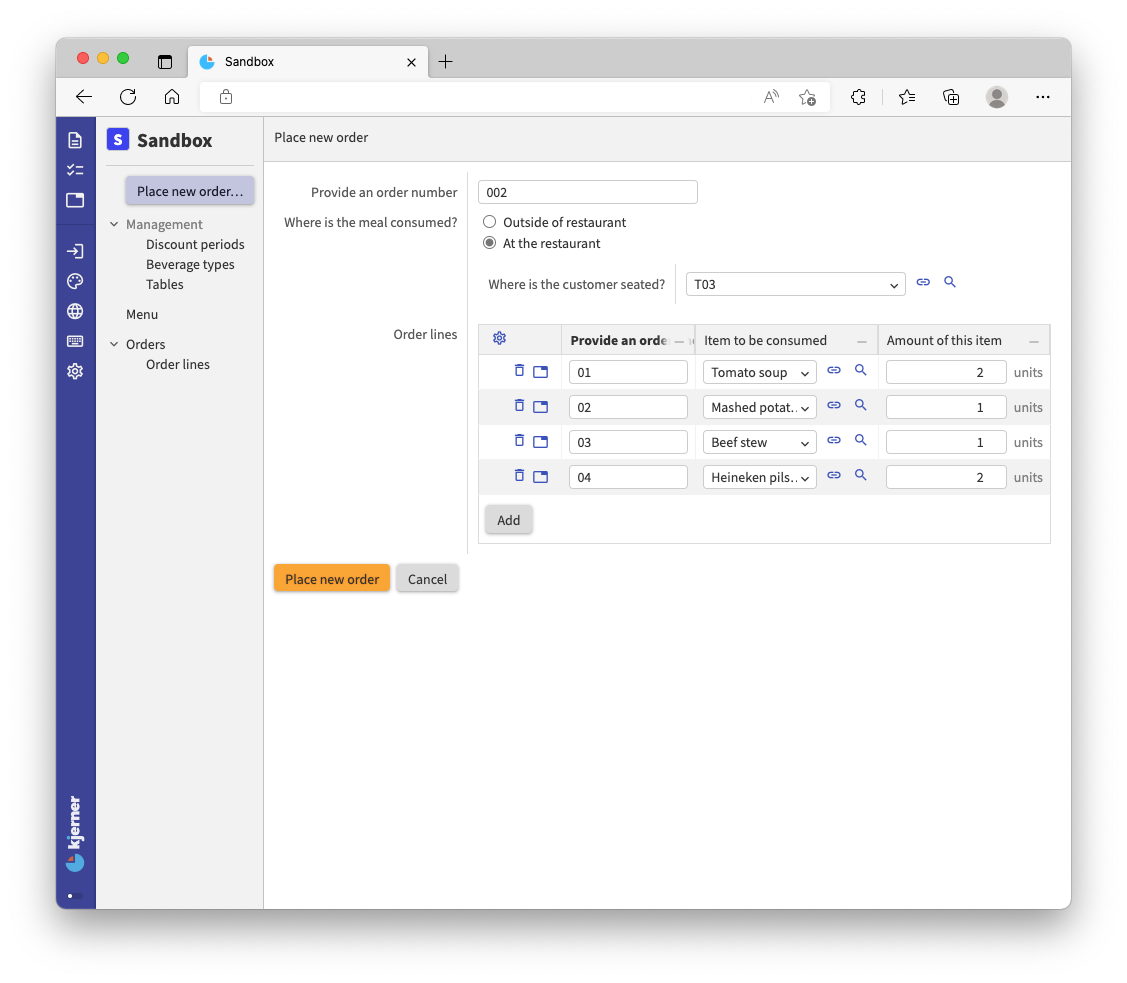
Now click Place new order below the form and then click Cancel (to cancel next order entry).
Then go to Orders and select your order:
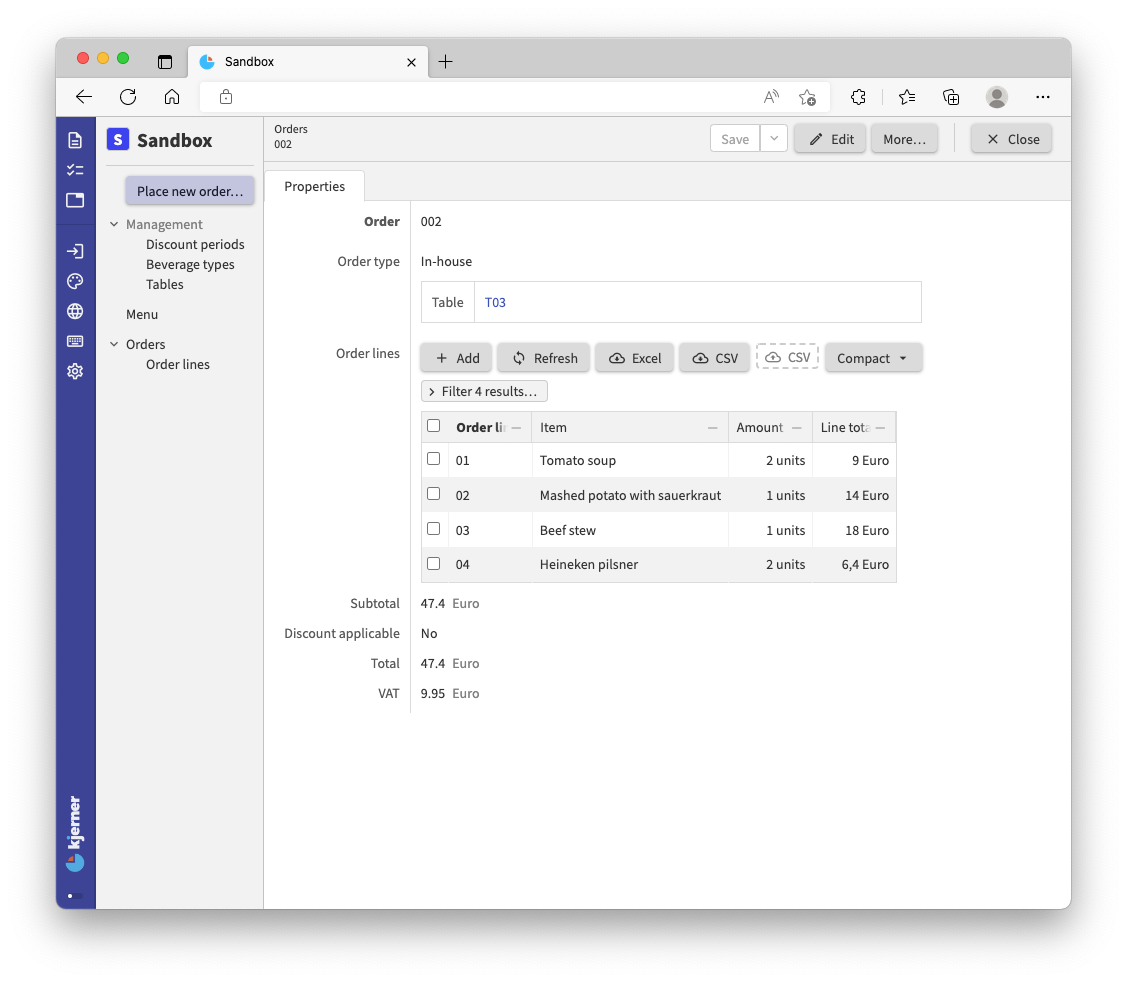
We have successfully added an order to the Orders collection by filling out the requested fields in the form.
If you closely inspect the example, you can see that the choice for At the restaurant in answer to the question Where is the meal consumed? is translated into the state In-house of stategroup Order type.
Let’s take a closer look at our code for the command. The first part of the command looks a lot like a data model. And that is what it is: for expressing the required parameters (fields) for a command, we define a small data model:
'Place new order': command {
	'Provide an order number': text
	'Where is the meal consumed?': stategroup (
		'Outside of restaurant' { }
		'At the restaurant' {
			'Where is the customer seated?': text -> .'Tables'[]
		}
	)
	'Order lines': collection ['Provide an order line number'] {
		'Provide an order line number': text
		'Item to be consumed': text -> .'Menu'[]
		'Amount of this item': number 'units'
	}
} ...
In this small data model inside our main model, we can express references to the main model, like -> .'Tables'[].
Like for references in our main model, the navigation expressions are evaluated with respect to the node where we call the command.
So, for a command on the root, the navigation expression is evaluated with respect to the root node.
If instead we have a command called Remove order line for Orders, we will get a button when opening an Orders item.
When picking a Line from the Order lines, we can choose from the lines from the open Orders item.
Navigation expressions are evaluated with respect to the Orders item for which we click the command button, called the ‘this’-node.
'Orders': collection ['Order'] {
	'Order': text
	'Remove order line': command {
		'Line': text -> .'Order lines'[]
	} => update .'Order lines' = delete @ >'Line'
}
If needed, you can also express references inside the small data model by starting the reference with the special keyword @.
We use this special keyword for jumping to the nearest parameter node at runtime.
After the mini model that expresses required parameters for the command, we express the operations that are to be performed, like:
... => update .'Orders' ...
The double arrow can be read as ‘do’.
The keyword update expresses that we want to update an attribute.
The path that follows resolves to the attribute value that we want to update: the collection of Orders.
Instead of update we can also use these keywords: switch, ignore, walk, execute, and external, just so you know that there are multiple options.
Let’s stick with update for now, as we want to update the specified collection with provided data.
The command implementation concludes with:
... = create ( ... )
This tells us what the update should be about: ‘the update is (=) the creation (create) of a node.
Instead of create, you can also use ensure.
Create will check if an entry in the target collection with the provided key already exists, and reject the whole command in that case.
The ensure operation does not fail. It creates the node, or otherwise overwrites values in the way that you specify in your model.
The part between the parentheses of keyword create reads:
'Order' = @ .'Provide an order number'
'Order type' = switch @ .'Where is the meal consumed?' (
	|'Outside of restaurant' => create 'Takeaway' ( )
	|'At the restaurant' as $ => create 'In-house' (
		'Table' = $ .'Where is the customer seated?'
	)
)
'Order lines' = walk @ .'Order lines' as $ (
	create (
		'Order line' = $ .'Provide an order line number'
		'Item' = $ .'Item to be consumed'
		'Amount' = $ .'Amount of this item'
	)
)
This part expresses how the new order is constructed from the command parameters.
For example, the attribute Order will hold whatever the external app provides for Provide an order number.
Note that we use the keyword @ here multiple times to jump to the nearest parameter node (the dataset that conforms to our mini model).
<tutorial folder:
./_docs/tutorials/restaurant1/step_06b/>
The End
This concludes the tutorial into the application language, at least for now: there is more to follow.
For a sneak preview, you can take a look at the additional tutorial folders we provided, and see if you can understand the models yourself.
The documentation can also help you a lot there, and don’t forget about the forum!
Have fun building your own applications, and don’t forget: begin with the end in mind and experiment!