Application Tutorial:
a Restaurant app
Part I
- Introduction
- Modeling data
- The minimal model
- Deploying the app
- Numerical-types
- Stategroups
- Built-in attribute types
- References
- States versus references
- Next
Introduction
This tutorial aims to give you a basis for modeling data with the application language: the main language for building Alan apps.
Before you get started, make sure that you have completed the IDE tutorial.
In the application language, you write application models.
An application model (an application.alan file) expresses all core parts of your application.
This includes – but is not limited to – the required data structure, computations, business processes, authentication and authorization.
You start by specifying the most basic ingredient of a data-intensive application: base data.
This is the primary data an application needs to work, like a menu which is essential for a meal ordering app.
Note that this includes all state that is important to your application, like the status of an order or a payment.
On top of the base data model, you express other aspects such as required permissions for reading a piece of data, or a todo item for a rejected payment.
By means of a story we will take you along several topics and build up the model at the same time. At the end of some topics, a reference to a tutorial folder is provided in case you need extra help to get the expected result. Enjoy!
Imagine you own a restaurant. Business is doing so well you start to feel you need to be more in control of what’s going on, before chaos sets in.
Alan to the rescue!
Alan is a platform that provides a language to model your data and processes in a flexible, yet structured way. From the model that you create, the Alan platform generates a fully fledged web application for entering data and reviewing the state of your restaurant.
So, let’s dive in!
Modeling data
A restaurant is nothing without a good menu. So, first, let’s take a look at the menu that shows us all the good food and nice drinks you offer.
Menu
| Appetizer | Price (€) |
|---|---|
| Shrimp salad | 3,50 |
| Tomato soup | 4,50 |
| Ciabatta with tapenade | 2,50 |
| Main course | Price (€) |
|---|---|
| Beef stew | 18 |
| Grilled salmon | 16,50 |
| Mashed potato with sauerkraut | 14 |
| Dessert | Price (€) |
|---|---|
| Chocolate mousse | 4,50 |
| Vanilla ice cream | 3,50 |
| Cherry pie | 4 |
| Drinks | Price (€) |
|---|---|
| Orange juice | 4,50 |
| Spa rood | 3 |
| Heineken pilsner | 4,20 |
| Cappuccino | 3,50 |
| Mint tea | 3 |
| Mojito | 6,30 |
This menu shows 5 kinds of data:
- The item that can be ordered (
Item name) - The price per item in Euro (
Selling price) - If it is a dish or a beverage (
Item type) - The type of dish or beverge (
Dish type/Beverage type) - And of course, that this collectively is a menu (
Menu)
If we want to describe the data in this menu in an Alan application, we can start with an Alan model of a menu:
'Menu': collection ['Item name'] {
	'Item name': text
	'Selling price': number 'euro'
}
This small, unfinished model tells us that a Menu is a collection: a collection of Menu items. Each menu item has an Item name and a Selling price. Each menu item can be uniquely identified by its Item name, like ‘Chocolate mousse’. ['Item name'] after collection expresses that: Item Name is the key attribute. An Item Name such as ‘Chocolate mousse’ is a key of a Menu item.
A single Menu item consisting of an Item name and a Selling price is called a node (e.g. ‘Chocolate mousse’, ‘4,50’). So, a Menu-collection stores nodes (menu items). In the model, curly braces ( { … } ) and everything inbetween define the type of a node (Menu item).
Item name holds a value of type text: an Item name is a piece of text.
Selling price holds a value of type number. The meaning of the number is expressed as well: euro. A Selling price is a number representing a euro amount.
Menu, Item name, and Selling Price are attributes of a node. The keywords collection, text and number in a model express the types of the attributes. An attribute type specifies what kind of data an attribute can hold.


The minimal model
Let’s make an app from the Menu model.
For that we need the following code in our ./models/model/application.alan file.
Let’s open it up, and put down the following code that describes the main sections of an application model:
users
	anonymous

interfaces

root { }

numerical-types
This is the minimal model that is needed for every application that you build on the Alan platform.
The users section defines who can access your application and how.
We use anonymous for now, which means that anyone can access your app and read and edit the app data.
In the application language documentation you can find more details about the users section.
The interfaces section defines what other apps and/or databases this app is connected with.
For now we stay ‘disconnected’ from other apps and databases.
The root { } section defines the root node type, as you can guess by the curly braces.
This is where you start modeling your application: a single root node holds all application data.
Paste the Menu model that we created earlier, between the braces.
The numerical-types section defines which units are used in your application and how to interpret them.
We use 'euro' as the unit for the Selling price of a Menu item, so let’s add 'euro' to the numerical types.
Our model should now look like this:
users
	anonymous

interfaces

root {
	'Menu': collection ['Item name'] {
		'Item name': text
		'Selling price': number 'euro'
	}
}

numerical-types
	'euro'
By the way, when you type Alan code, make sure to use whitespace between keywords, and tabs for indentation! Otherwise, the compiler will start complaining.
Deploying the app
How to get this app up and running? The model needs to be processed to produce executable code for a server.
This is done by a compiler that is part of the Alan platform tools.
You can download the platform tools by clicking Alan Fetch in VS Code, or by running ./alan fetch from the command line.
Alan Fetch uses the versions.json file in your project root to determine which versions of the tools are needed.
When Alan Fetch is done, you can build (compile) an application by clicking the button Alan Build or running ./alan build from the command line.
If your model and other parts of your Alan project are valid, the compiler shows no errors.
After editing your model, you need to run Alan build again to see if the model is still valid.
Note that if you build your application regularly, it is easier to troubleshoot errors.
When you can successfully build your application, you can run Alan Deploy to transform your project into an app, ready for you to be used.
When clicking Alan Deploy, you get a menu where you can choose a ‘data source for this deployment’.
For your first deployment, select the empty option.
Throughout this tutorial, we recommend that you keep using the empty option.
For keeping application data from a running app, you can use the migrate option, as explained in the migrations guide.
When opening your app in a webbrowser (we assume you use a chromium-based browser) it should look like this when clicking Menu in the left column, except that there will be no data:
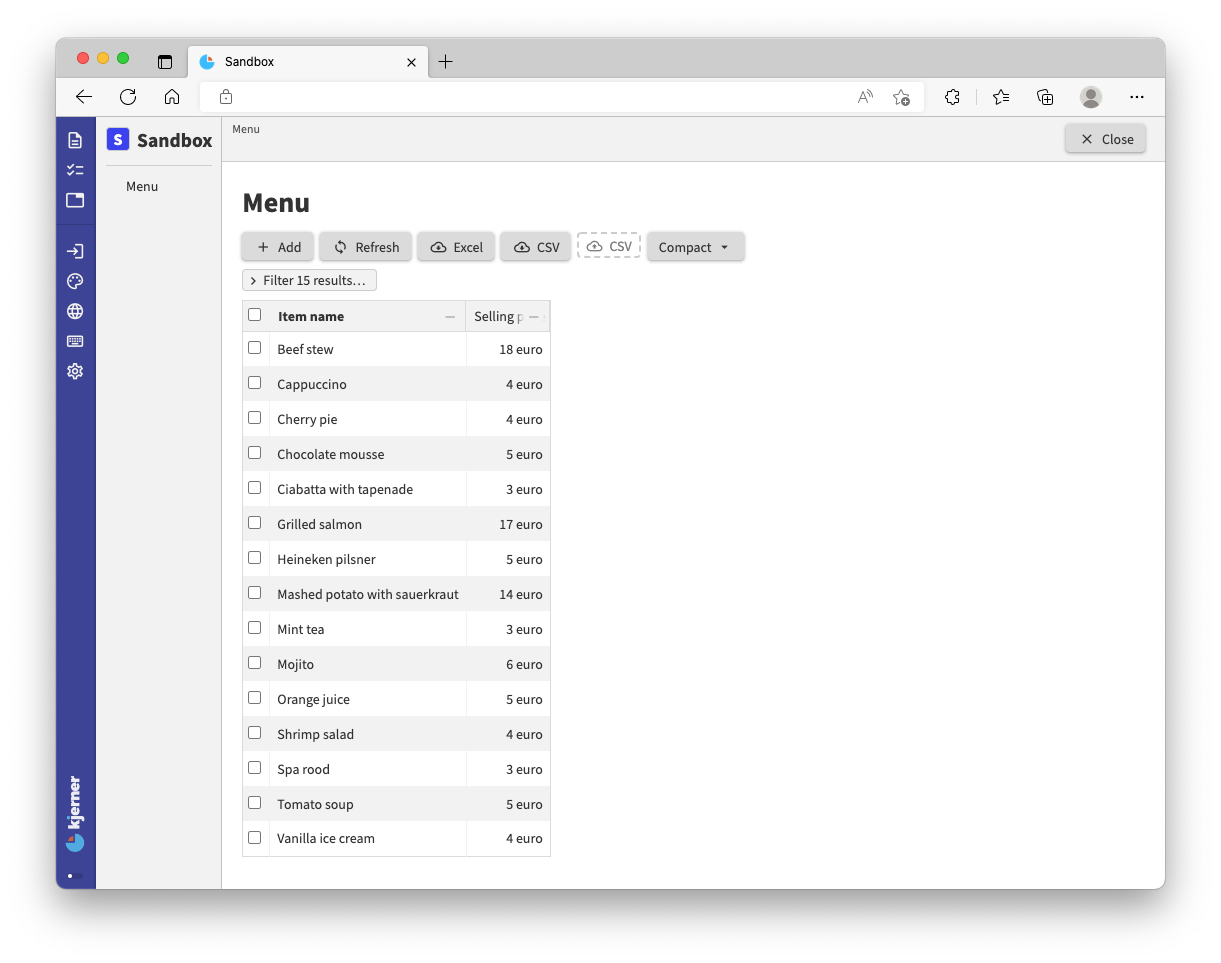
Add some Menu items to familiarize yourself with the Graphical User Interface (GUI).
Click Add to start adding a new item.
Then, fill in the required fields for the item.
Click Save and Close (top right corner) when you’re done.
This will bring you back to the Menu table, where you can add more items and modify existing ones.
For this tutorial, you can use test data from the _docs folder, such that you do not start with an empty app after updating your model.
For that:
- click
Alan Deployand choose the ‘migrate’ option to create the foldermigrations/from_release, - open the
migration.alanfile for the relevant tutorial step in_docs/tutorials/restaurant1/:step_01/migration/migration.alanfor the current step, - copy the contents of the
migration.alanfile to the clipboard, - paste the clipboard contents in
migrations/from-release/migration.alan, overwriting the existing file contents. - click
Alan Deployand choose the ‘migrate’ option again. After succesful deployment, you can find the data in your app.
<tutorial folder:
./_docs/tutorials/restaurant1/step_01/>
Numerical-types
Maybe you’ve noticed that when you enter a number with decimals, the price is rounded to a whole number:

That is because internally, Alan only stores whole numbers. You have to use a numerical type that describes the accuracy that you want. Then you can tweak the GUI such that decimals work as well.
Go back to your model, change euro at the Selling price to eurocent, and make sure your numerical-types section looks like this:
numerical-types
	'eurocent'
		@numerical-type: (
			label: "Euro"
			decimals: 2
		)
The @numerical-type: part is a GUI annotation; an instruction for the graphical user interface of your app.
We can specify the label that we want to see if we want it to be different from the label of the numerical-type (here Euro instead of eurocent).
Furthermore, we can specify the number of decimals that the user can enter: 2 as the accuracy is eurocent.
There’s much more to numerical-types, but we’ll leave it at this for now.
For a better understanding of the syntax, read the syntax guide.
Stategroups
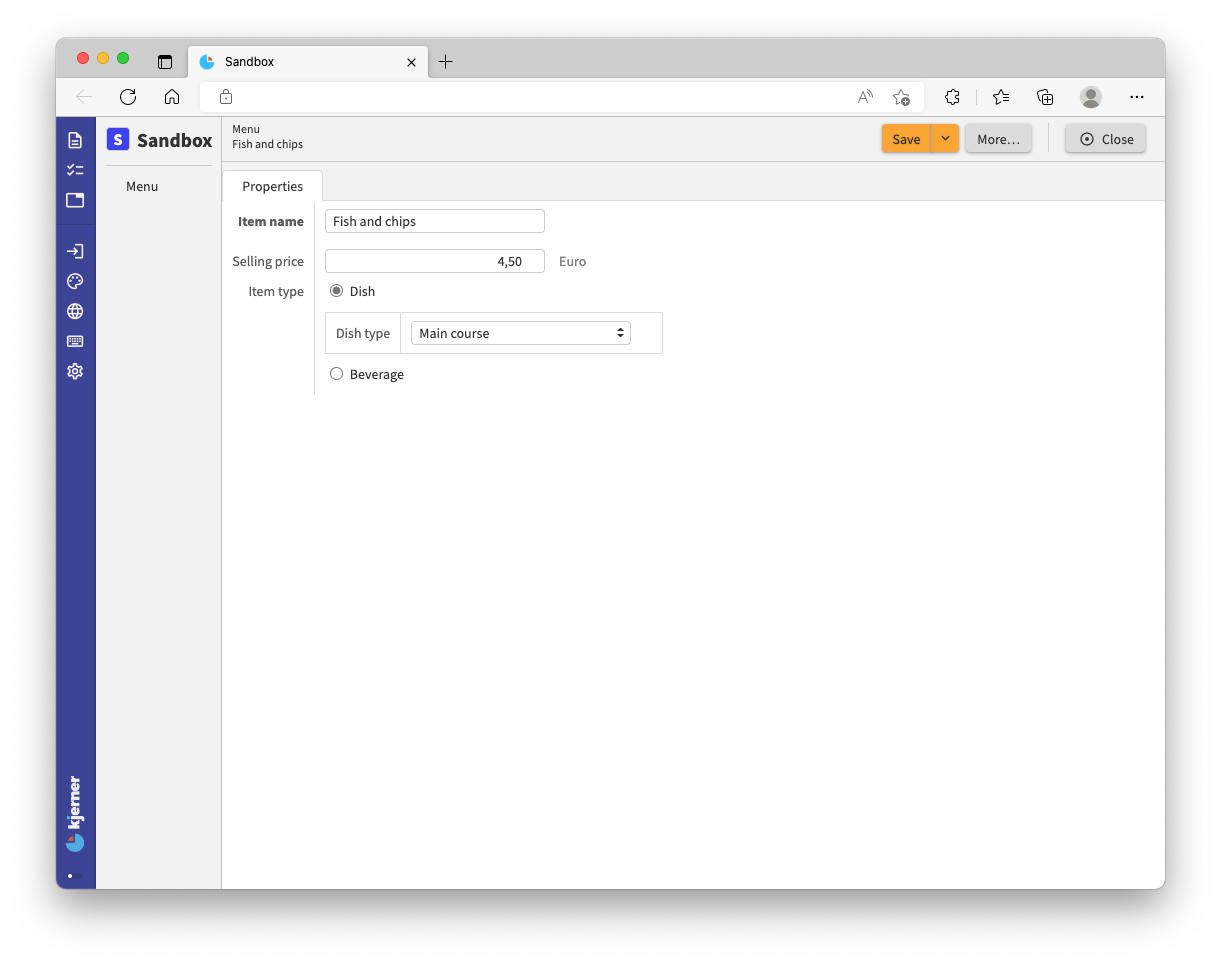
For our Menu items, we want our application to store some additional information.
For example, we want to store if an item is a dish or a beverage.
For that, we add an Item type to our model:
root {
	'Menu': collection ['Item name'] {
		'Item name': text
		'Selling price': number 'eurocent'
		'Item type': stategroup (
			'Dish' { }
			'Beverage' { }
		)
	}
}
An Item type is a stategroup attribute, which holds a choice between states: Dish or Beverage.
Notice that you can specify attributes specific to Dish and Beverage in your model between the curly braces.
So, depending on the state that a user chooses, different data will be stored.
For example, a dish can be an appetizer, main course, or dessert.
This again is a choice, so let’s make the states available by adding the attribute Dish type of type stategroup to the state type Dish.
In addition, let’s do something similar for Beverages, such that we can neatly organize menu items in our application:
root {
	'Menu': collection ['Item name'] {
		'Item name': text
		'Selling price': number 'eurocent'
		'Item type': stategroup (
			'Dish' {
				'Dish type': stategroup (
					'Appetizer' { }
					'Main course' { }
					'Dessert' { }
				)
			}
			'Beverage' {
				'Beverage type': stategroup (
					'Juice' { }
					'Soft drink' { }
					'Cocktail' { }
					'Beer' { }
					'Wine' { }
					'Coffee & tea' { }
				)
			}
		)
	}
}
Alan application models are hierarchical models specifying a hierarchical dataset: the root node holds a collection of Menu items.
Each Menu item (a node) has an Item type which can be Dish or Beverage.
Dish and Beverage are nodes which hold a Dish type and Beverage type, respectively.
The value of Dish type can be Appetizer, Main course, Dessert.
Similarly the Beverage type can be Juice or one of the other possible states that the model specifies.
Build and deploy to find out what stategroups and numerical-types do for your app. Make sure you set the view to Full, so you can see all columns:

The table now has a few more columns.
If you add an item yourself you’ll see radio buttons and a drop-down for choosing states for the added stategroup attributes:
You may notice that data you entered yourself in a previous step is gone! In a real world situation you of course want to keep your data. For that, you have to migrate it from the running application version to the next. As discussed before, for this tutorial we provide migration files for each topic, that you can find in the
_docs/tutorialsfolder.
<tutorial folder:
./_docs/tutorials/restaurant1/step_02/>
Built-in attribute types
Our restaurant is more than just a menu. We also have Tables; let’s express that in our model:
root {
	'Menu': collection ['Item name'] {
		'Item name': text
		'Selling price': number 'eurocent'
		'Item type': stategroup (
			'Dish' {
				'Dish type': stategroup (
					'Appetizer' { }
					'Main course' { }
					'Dessert' { }
				)
			}
			'Beverage' {
				'Beverage type': stategroup (
					'Juice' { }
					'Soft drink' { }
					'Cocktail' { }
					'Beer' { }
					'Wine' { }
					'Coffee & tea' { }
				)
			}
		)
	}

	'Tables': collection ['Table number'] {
		'Table number': text
		'Seatings': number 'chairs'
		'Orders': collection ['Order line'] {
			'Order line': text
			'Item': text -> ^ ^ .'Menu'[]
			'Amount': number 'units'
		}
	}
}
Don’t forget to add chairs and units to the numerical-types, as these numerical types are new to the model:
numerical-types
	'eurocent'
		@numerical-type: (
			label: "Euro"
			decimals: 2
		)
	'chairs'
	'units'
Deploy and check the app in your browser: click Tables in the left menu bar. Table number’s and corresponding Seatings are already there:
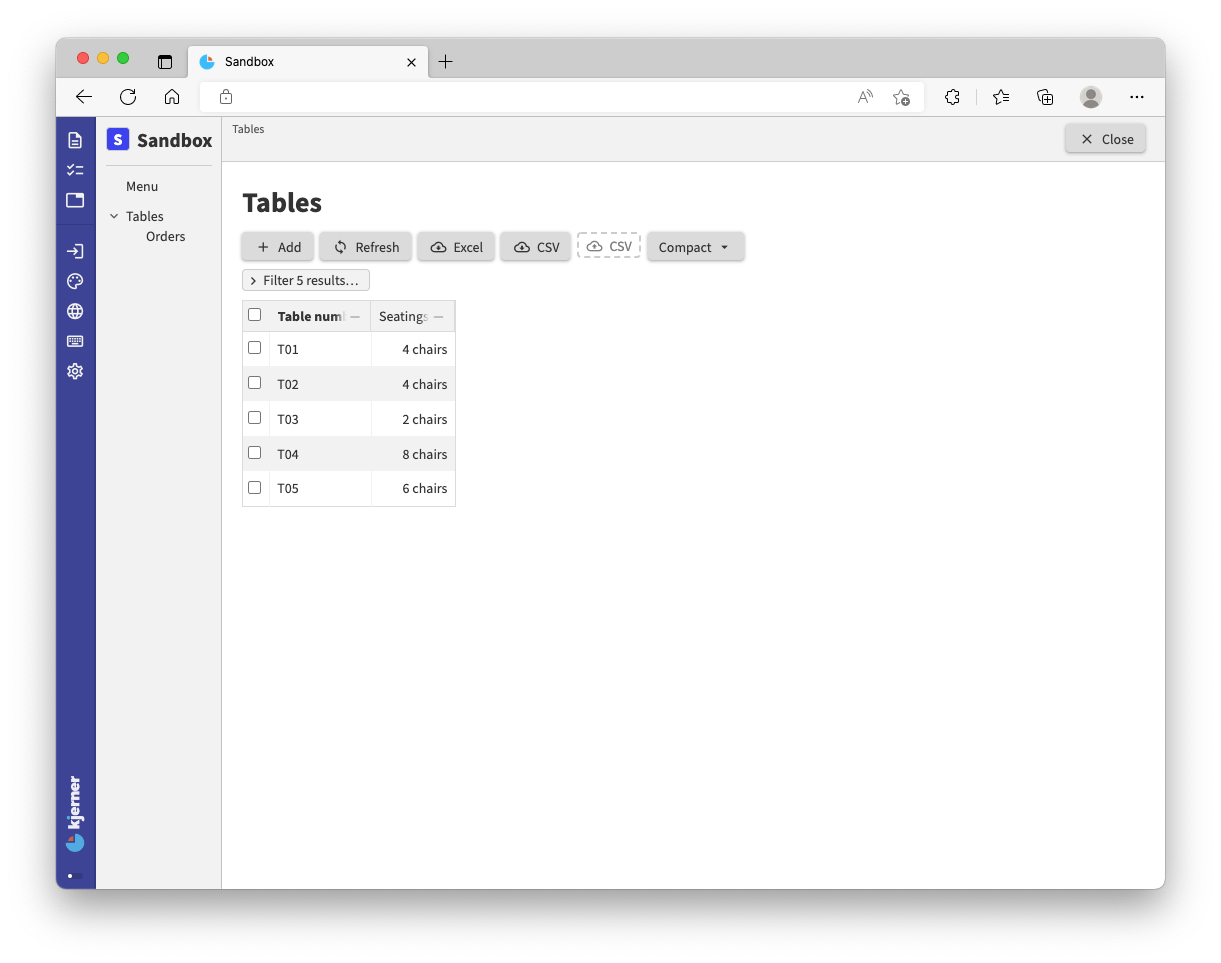
In the left column we see that Tables is parent to the child Orders, just like in our model:
we have specified a collection attribute Tables that nests a collection attribute Orders.
This means that in the app, each Tables item has its own collection of Orders.
An Orders collection holds order lines.
An Order line describes an order for a specific Item with an ordered Amount:
| Order line | Item | Amount |
|---|---|---|
| 01 | Orange juice | 2 |
| 02 | Tomato soup | 2 |
| 03 | Beef stew | 2 |
| 04 | Chocolate mousse | 1 |
| 05 | Cappuccino | 1 |
<tutorial folder:
./_docs/tutorials/restaurant1/step_03/>
Overview of attribute types
The application language supports six built-in attribute types.
- A text attribute holds an unbounded string value (e.g. “this is text”).
- A number attribute holds an integer value (e.g. 31415927).
- A file attribute holds two unbounded string values representing a file token and a file extension (e.g. “screenshot” and “png”).
- A collection attribute holds a map of key-value pairs. Keys are string values that have to be unique such that we can reference them unambiguously. Keys are implicitly defined for collection attributes; values are nodes of an inline defined type (e.g.
{"001"; "Eggs"; 6; 'stired', 'fried'; 'omelette.jpg'}). - A stategroup attribute holds a value indicating a state. States are alternatives to a property that a state group attribute indicates, such as
'Main course'. - A group attribute holds a node of an inline defined node type. Group attributes add structure by grouping other attributes that belong together or share permission requirements, which we’ll discuss later in this tutorial.
References
There’s an interesting line in the model that needs our attention:
'Item': text -> ^ ^ .'Menu'[]
This line says that an Item on an order from a table refers to a Menu item.
First, let’s see what this means for our application.
Click on Tables on the left hand side.
Click table “T01” from the list (shown in the previous image) and then click the Add button next to Orders:
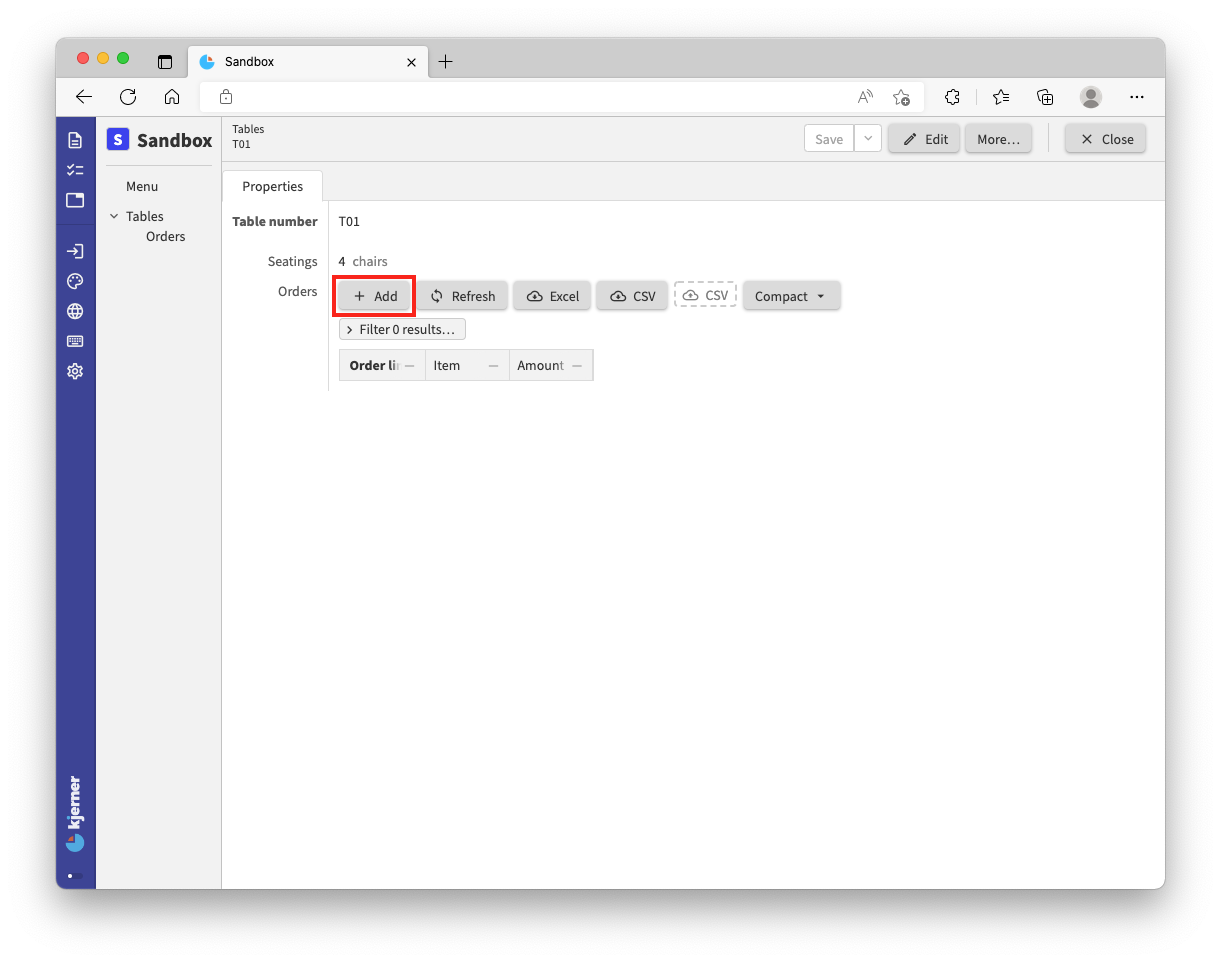
Enter an Order line, like “01” since its the first order from this table:
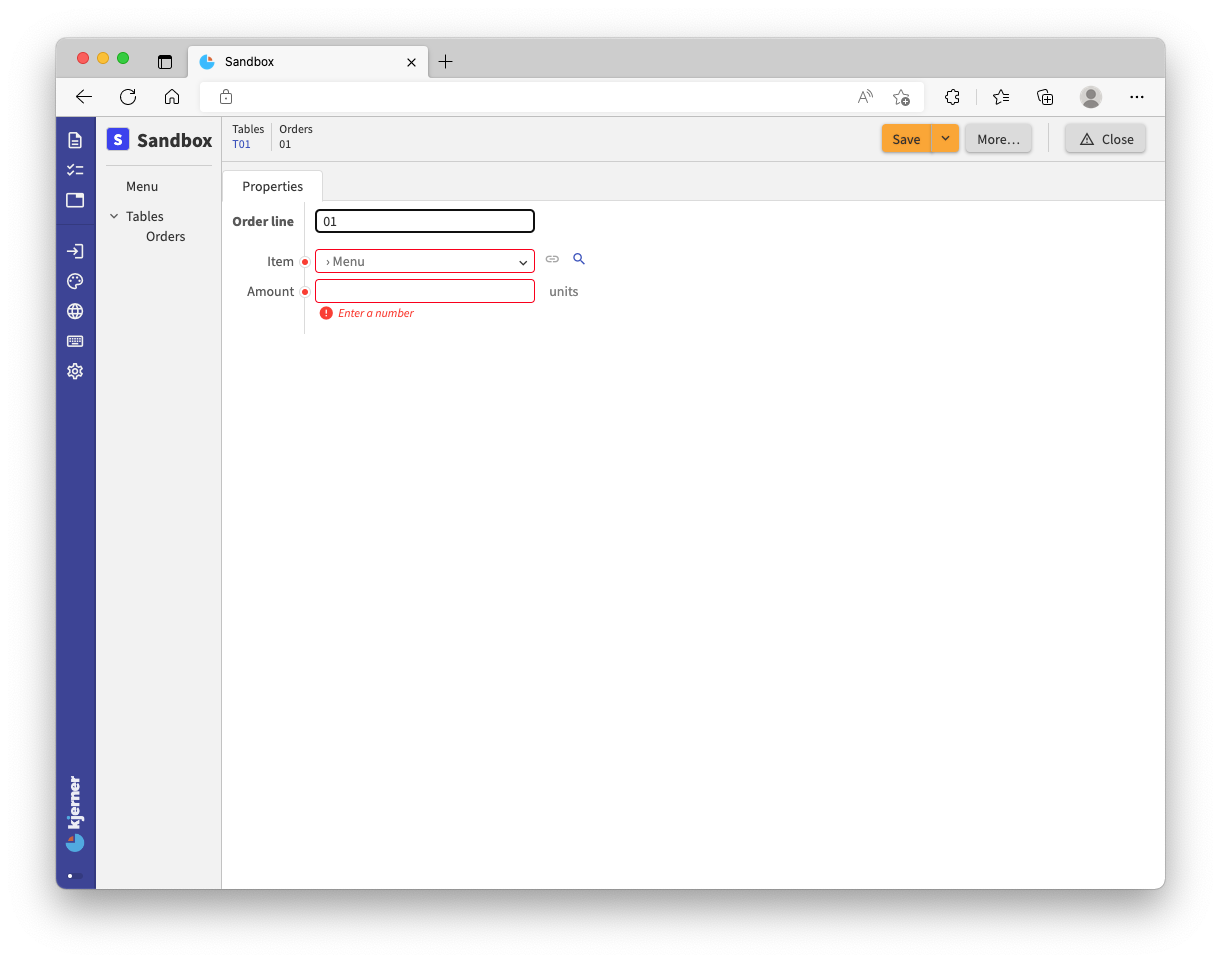
Now, click the magnifying glass next to the field for Item and you’ll see this:
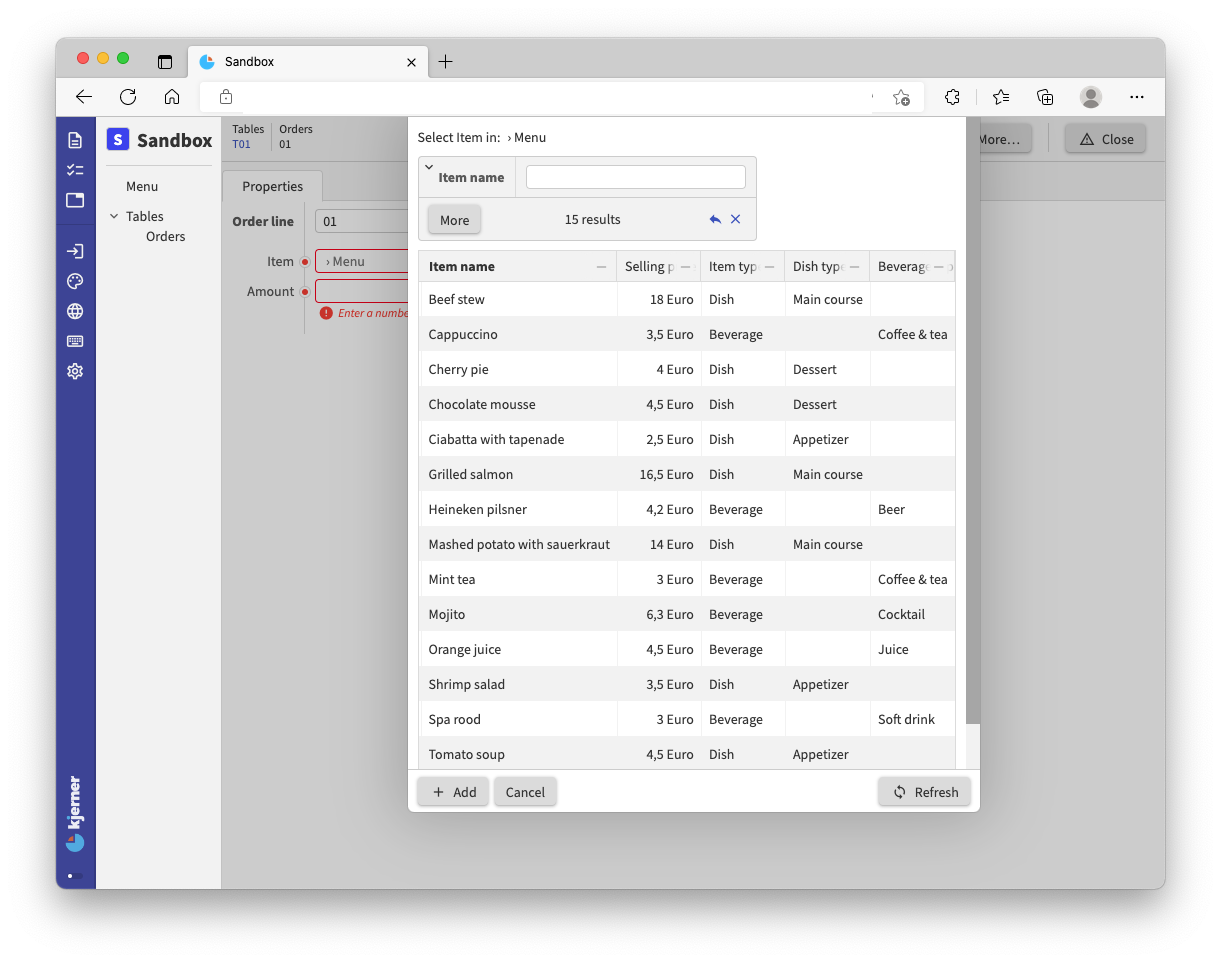
Here we see the items from the Menu and we can choose an item from the table.
Or, if we start typing in the box Item name, the table will be filtered.
We can only choose an item that is in the table.
When we click an item, the Item name from the item we clicked will be placed in the text field.
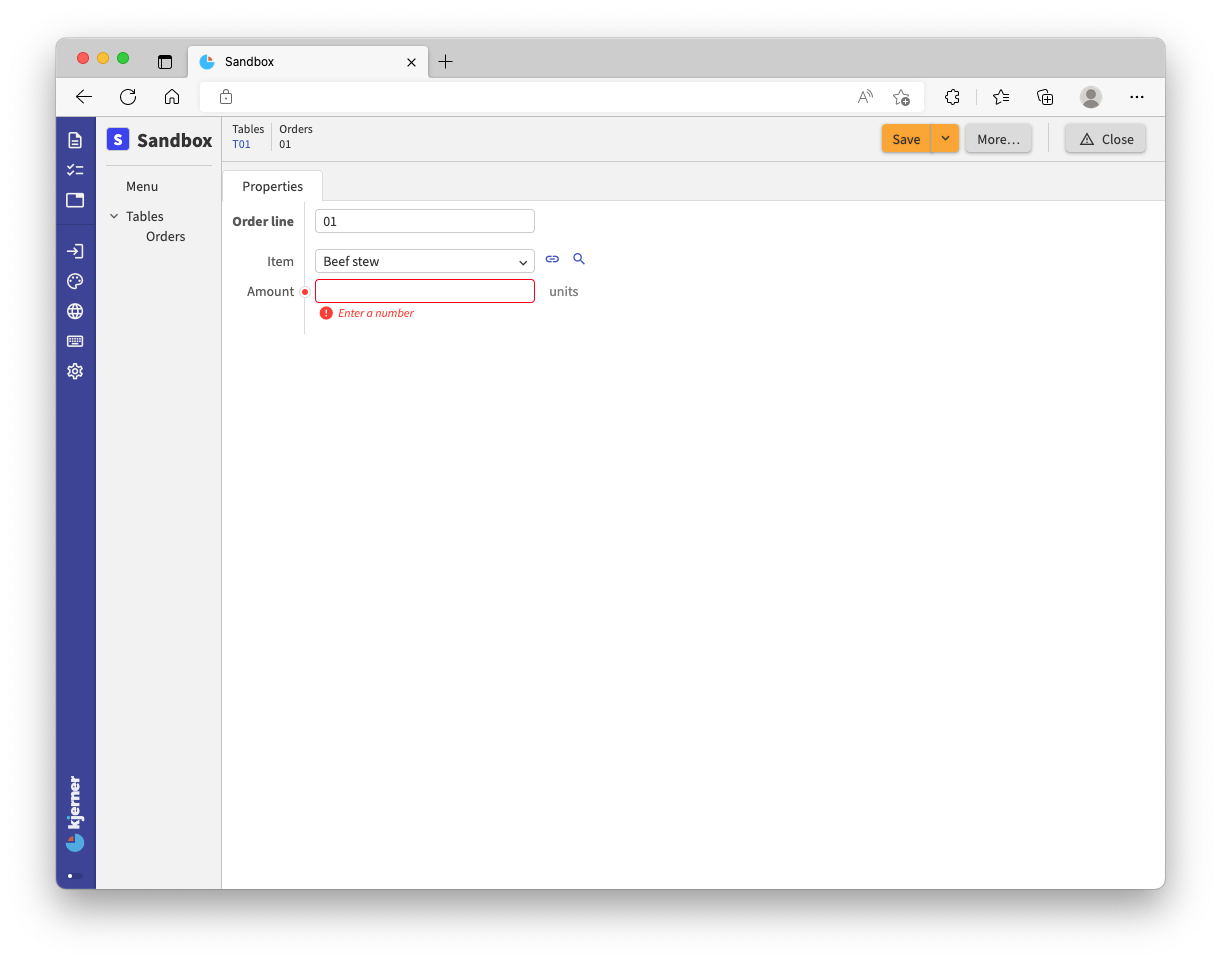
As explained above, the Item name is the key value of the Menu item.
It uniquely identifies a Menu item, and we can therefore use it to unambiguously reference an item.
With the lock-symbol you can now follow the reference from Beef stew to the actual Menu item.
Notice that the field for Item must contain the Item name of a Menu item such as Beef stew.
Other values are not accepted by your application.
This is because in our model, we have used this arrow keyword ->, which is for mandatory references (also: constraints).
The navigation expression that follows the -> in the model, expresses how the application can find the collection holding Menu items.
The keyword ^ tells the application to go to the parent node.
For an Orders item “01” (a node), the parent node is a Tables item “T01” (which is also a node).
Then we have another ^, so the application knows that another parent step is required: from the Tables item to the root node. The root node holds the Menu items.
To instruct the application to look in that collection, the expression concludes with .'Menu'[].
Which means: look up the Item value in the Menu collection.
In a model you can just count opening curly braces ({) above an expression to see where a series of ^ leads to, as each curly brace corresponds to a node in your application when navigating from a child node to a parent node:
root {
	'Tables': collection ['Table number'] {   // curly brace 2 (match second ^)
		'Orders': collection ['Order line'] { // curly brace 1 (match first ^)
			'Item': text -> ^ ^ .'Menu'[]
...
In summary, the expression states that
Itemis a text value and references aMenuitem. Therefore, the text value of an item has to equal theItem name(key value) of aMenuitem.
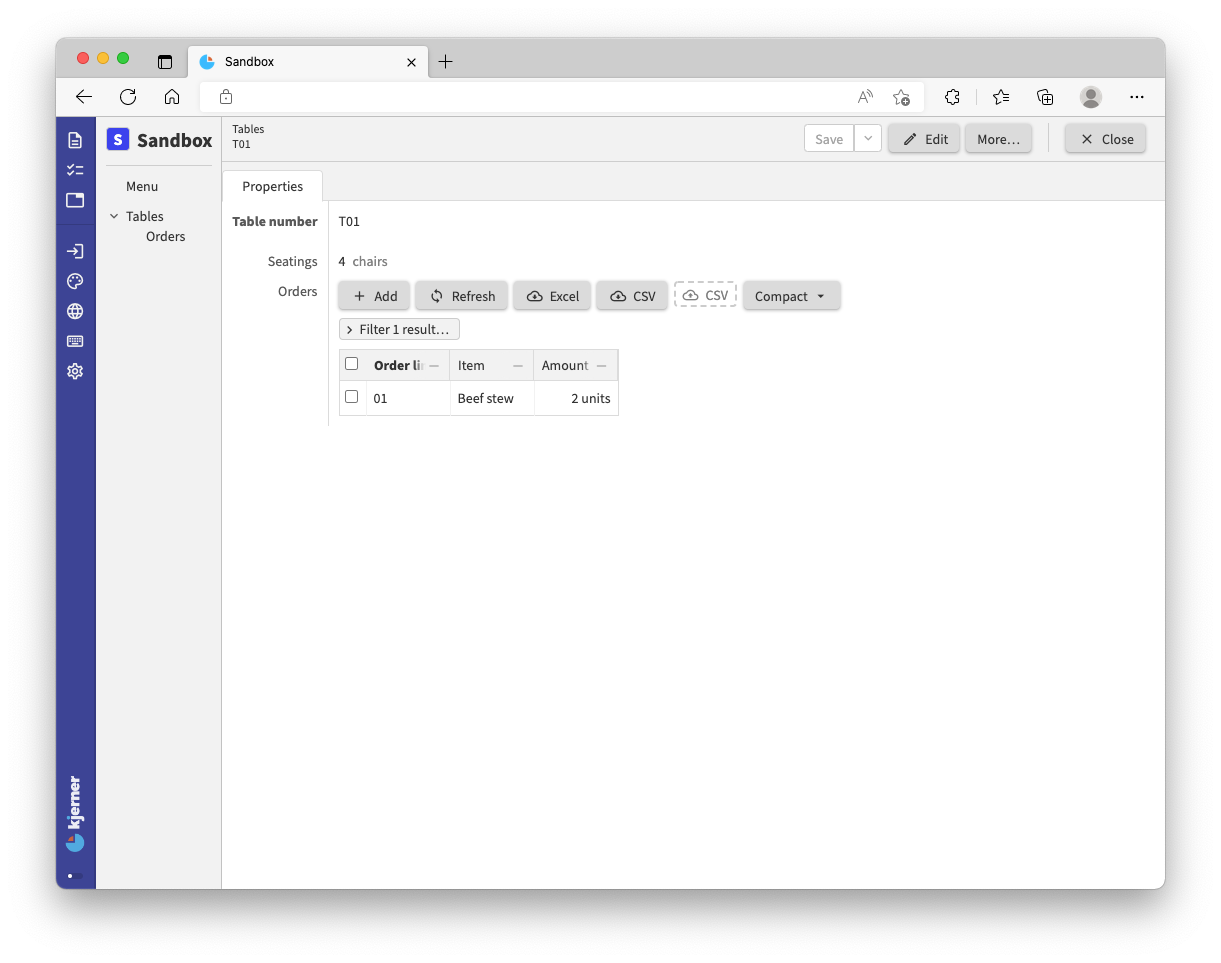
Entering an amount, clicking Save and then Close gives this result:
Sometimes you may want references to be optional rather than mandatory. When you import data from other apps this is necessary, as you can typically not force those apps to respect your wishes concerning your text values. For optional references, you use the keyword ~> (tilde arrow) instead of -> (dash arrow).
States versus references
Hopefully by now you can ‘read’ this model and understand its components and structure. Meanwhile our restaurant is in full swing, so no time to waste!
You may have noticed in your restaurant that having a fixed set of beverage types is impractical.
Let’s change that by supporting a dynamic set of beverage types.
For that, you need to remove the code for the Beverage type attribute, and express that you have a collection of Beverages types instead.
As we still want to be able to select a Beverage type when we compose our Menu, we need to be able to reference a Beverages types item from the state Beverage in our model.
users
	anonymous

interfaces

root {
	'Beverage types': collection ['Beverage type'] {
		'Beverage type': text
	}

	'Menu': collection ['Item name'] {
		'Item name': text
		'Selling price': number 'eurocent'
		'Item type': stategroup (
			'Dish' {
				'Dish type': stategroup (
					'Appetizer' { }
					'Main course' { }
					'Dessert' { }
				)
			}
			'Beverage' {
				'Beverage type': text -> ^ ^ .'Beverage types'[]
			}
		)
	}

	'Tables': collection ['Table number'] {
		'Table number': text
		'Seatings': number 'chairs'
		'Orders': collection ['Order line'] {
			'Order line': text
			'Item': text -> ^ ^ .'Menu'[]
			'Amount': number 'units'
		}
	}
}

numerical-types
	'eurocent'
		@numerical-type: (
			label: "Euro"
			decimals: 2
		)
	'chairs'
	'units'
Notice that we place Beverage types above the Menu.
That is quite logical as Beverage types should be entered before creating a Menu, but the compiler requires it as well.
By default, expressions in an application model point to earlier defined attributes.
This is important for the guarantees that the language gives you, which we discuss in the docs.
Again, build and check your app, selecting Beverage types from the left menu bar:
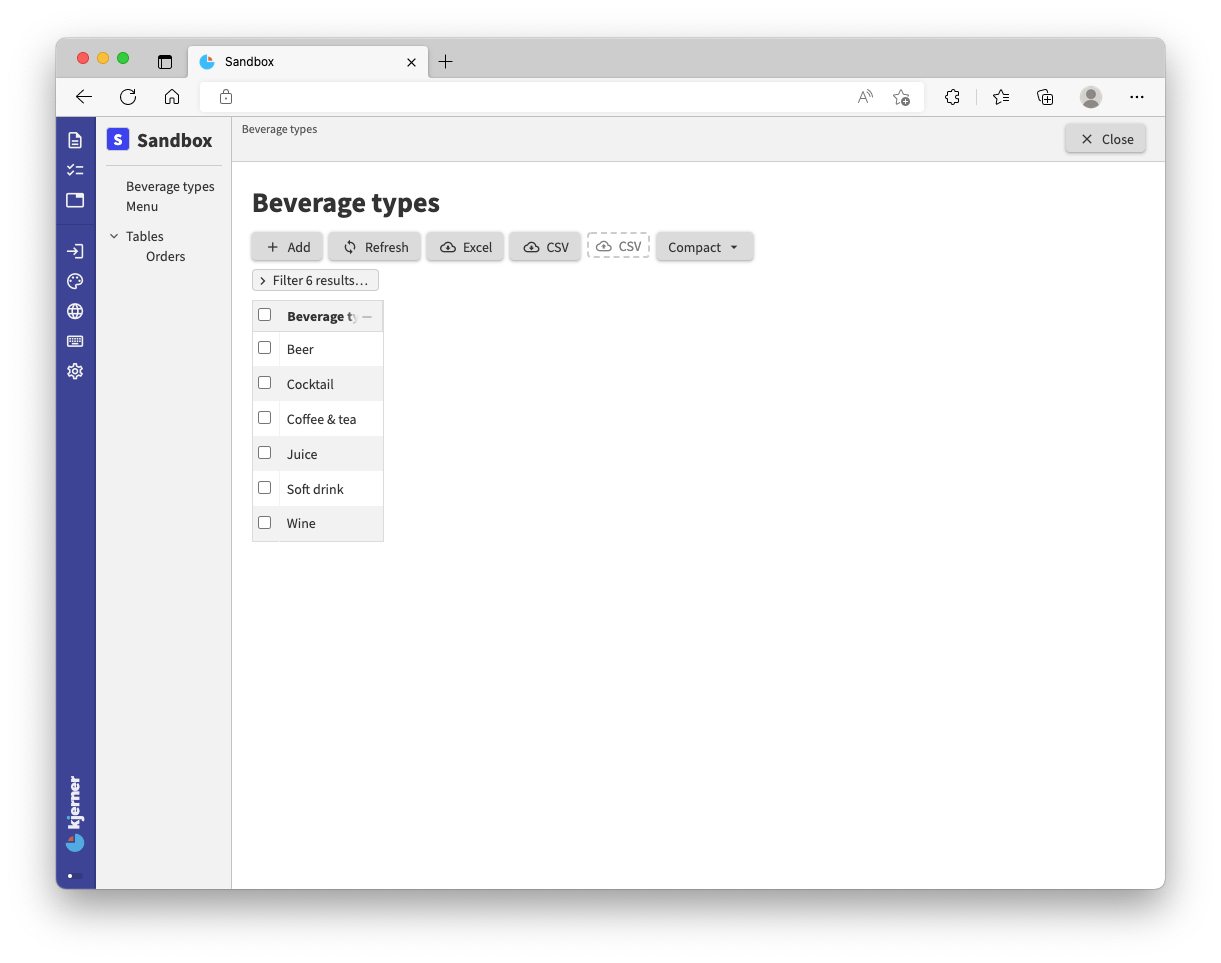
Now you are free to add or adjust the Beverage types you have in your restaurant while also being able to use them in your menu setup:

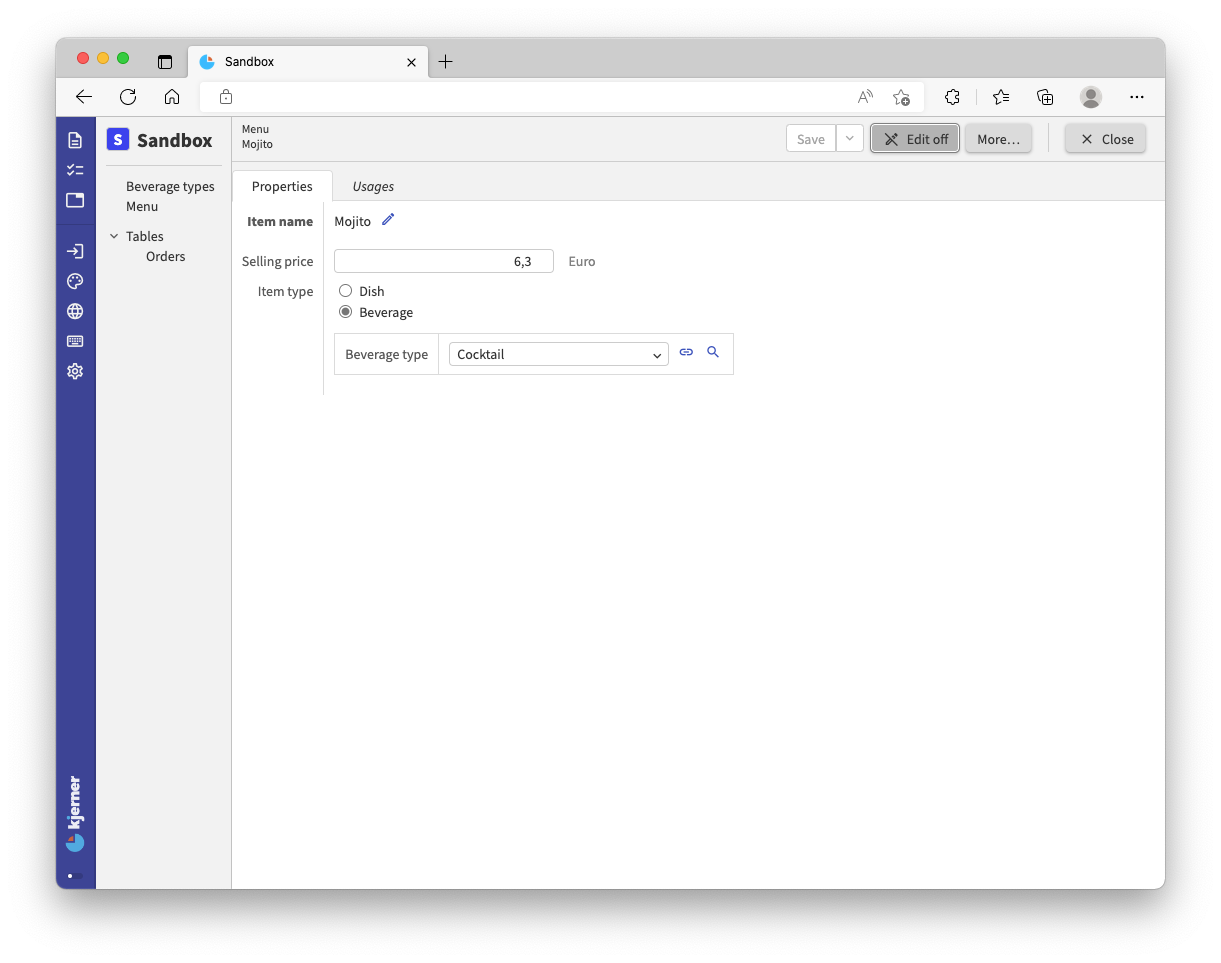
Click on ‘Mojito’, click on the Edit button (top right):
and finally hit the magnifying glass on the right side of Beverage type:
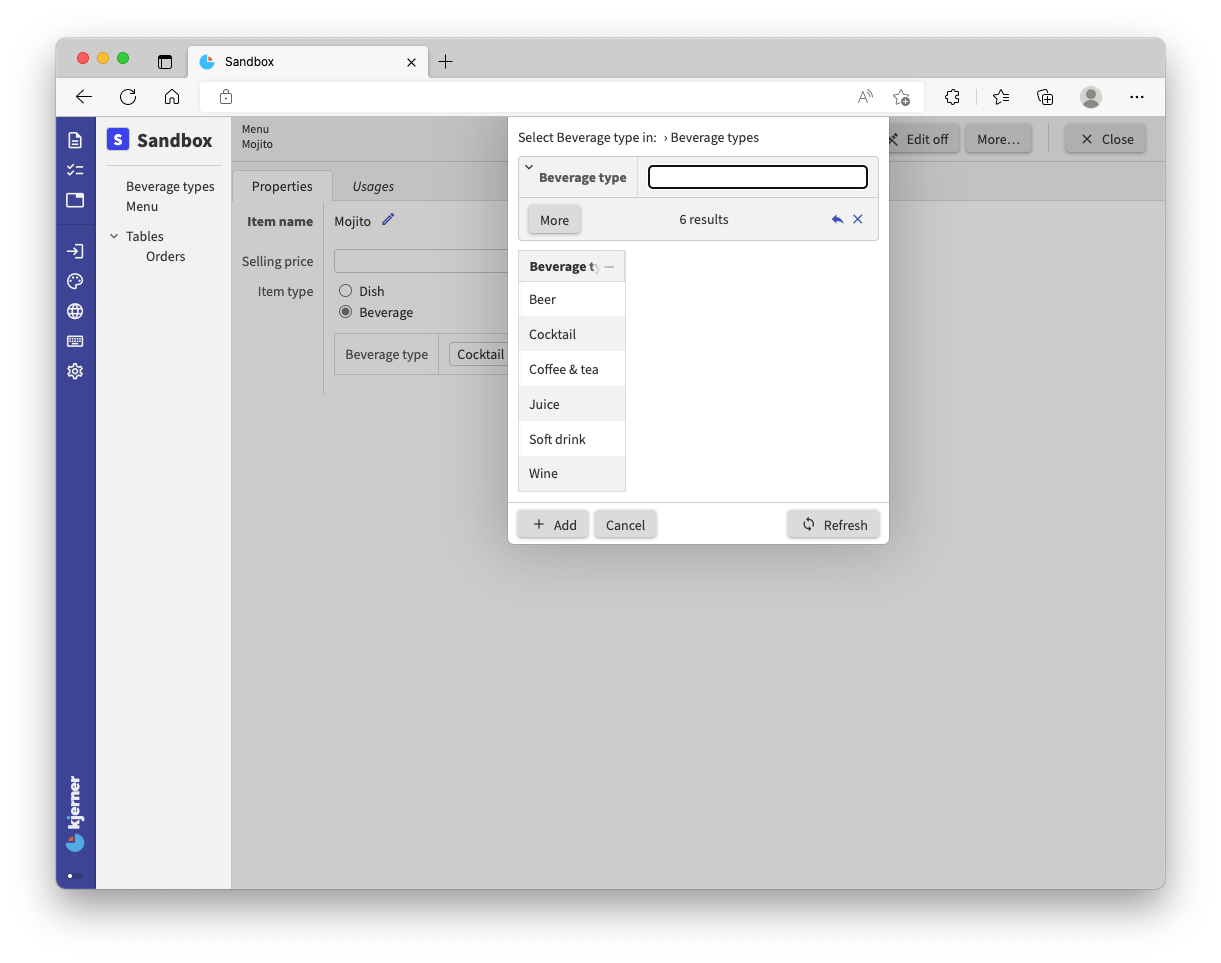
Here, we can choose the Beverage type of ‘Mojito’. The collection Beverages types is shown, just like the Menu items earlier in this tutorial.
<tutorial folder:
./_docs/tutorials/restaurant1/step_04/>
Next
This concludes the introductory tutorial into the application language, and hopefully begins your journey in the world of Alan.
If you have any questions or comments about the tutorial or the platform, feel free to post on the forum!
In this tutorial, we’ve only touched the basics: you can now create your own data model and generate an app for it. A few words of advice for when you feel ready to start building your own application:
- Begin with the end in mind. What is the purpose of your app and what data is required to support this purpose? How can you organize the data in collections?
- Experiment. Just try it! If something does not work exactly the way you want or expect, you can easily restructure and reuse parts of the model you have already created.
But, there is still a lot to discover. In Tutorial C: a Restaurant app, Part II we discuss derived values, inverse references, commands, and more.